With ROS, creating a robotic system means developing programs in C++ or Python, making ROS inaccessible to all non-developer experts: process engineers, industrialization engineers...
Writing code is indeed becoming essential for complex robots.
However, for several years now, an alternative method has been making headway: no-code. This consists of designing computer programs without writing code, often via a graphic interface. This project consists of developing a prototype of a "no-code ROS" that can be used to program manipulative robots under MoveIt and rolling robots.
Ronoco connects to the ROS ecosystem and generates standard ROS messages, maintaining the interoperable ROS (robot-agnostic) DNA.
The ronoco project is divide into three distinct modules, each fulfilling different and complementary roles to provide a graphical interface for designing ROS manipulation programs.
The three modules are ronoco-vm a ROS package consisting of a flask API that interprets the sequence of blocks in the GUI and translates them into ROS code. The second is ronoco-nodered, an extension to the Node-RED application that allows you to graphically create action sequences using behaviour trees
The last one is ronoco-ui a web client allowing to use the two previous modules. It provides utilities for the robot (registering positions, launching a program, stopping the server etc). Moreover, it allows defining programs using a no-code interface like NodeRed or Scratch (WIP)
Can ronoco be used on my robot?
To use ronoco with your robot it is necessary that it has the following specifications:
- For a manipulator robot it is necessary that it is compatible with MoveIt. Ronoco mainly uses MoveIt to control the manipulator robots and the rviz visualization topics
- For a rolling robot it is necessary that it is compatible with MoveBase. Ronoco uses the SimpleActionClient of move base for navigation. The robot will also have to provide a topic where it publishes its current position (typically /amcl_pose) as well as a topic allowing it to be teleoperated (typically /cmd_vel)
If your robot meets these specifications you can use ronoco with it!
Users guides
These guides are intended for users who want to install and use ronoco. The guides are illustrated with examples of how ronoco is used on different robots.
Installation
The installation is divide into two parts. First it is necessary to install ROS Noetic and then to install the different modules of ronoco. An installation guide for ROS noetic for Ubuntu is provided below. Refer to the official page for more details
Ubuntu install of ROS Noetic
Configure your Ubuntu to allow "restricted", "universe" and "multiverse". You can follow the Ubuntu guide for instructions on doing this.
Set up your computer to accept software from packages.ros.org
sudo sh -c 'echo "deb http://packages.ros.org/ros/ubuntu $(lsb_release -sc) main" \
> /etc/apt/sources.list.d/ros-latest.list'
Set up your keys
sudo apt install curl # if you haven't already installed curl
curl -s https://raw.githubusercontent.com/ros/rosdistro/master/ros.asc | \
sudo apt-key add -
First, make sur your Debian package index is up-to-date then install ROS
sudo apt update
sudo apt install ros-noetic-desktop-full
You must source this script in every bash terminal you use ROS in
source /opt/ros/noetic/setup.bash
It can be convenient to automatically source this script every time a new shell is launched. These commands will do that for you
echo "source /opt/ros/noetic/setup.bash" >> ~/.bashrc
source $HOME/.bashrc

#or if you use zsh
echo "source /opt/ros/noetic/setup.zsh" >> ~/.zshrc
source $HOME/.zshrc
Ronoco
To install ronoco you need the following packages:
- npm
- python3
- ROS noetic (also works on ROS melodic)
To start it is necessary to clone the project in the catkin workspace
#if you haven't got a catkin_ws
mkdir -p $HOME/catkin_ws/src
cd $HOME/catkin_ws/
catkin_make

cd $HOME/catkin_ws/src/
git clone https://github.com/Sdelpeuch/ronoco.git
Then you have to install the three modules that constitute ronoco. Firstly ronoco-nodered allowing the user to define the behaviour trees of the robot (see How to use it and How to create a behaviour tree). This module depends on Node-RED, so it is necessary to install the framework and then the blocks specific to ronoco.
sudo npm install -g --unsafe-perm node-red
mkdir $HOME/.node-red/
cd $HOME/.node-red/
npm install $HOME/catkin_ws/src/ronoco/ronoco-nodered/
Once ronoco-nodered is installed it is necessary to install the web client inside ronoco-ui
cd $HOME/catkin_ws/src/ronoco/ronoco-ui/
npm install
Finally, all that remains is to install the application engine found in ronoco-vm.
cd $HOME/catkin_ws/src/ronoco/ronoco-vm/
pip3 install -r requirements.txt
Before using ronoco it is necessary to compile the ROS workspace
cd $HOME/catkin_ws/
catkin_make
source devel/setup.bash

#or if you use zsh
source devel/setup.zsh
Set up Rviz (optionnal)
If you want to view the different points and paths defined by ronoco in rviz it is necessary to add two markers in rviz.
To add a marker in rviz : click on "add" at the bottom left of the screen. A menu opens. Click on "Marker". Then in the menu on the left of your screen (Displays) find "Marker". Scroll down the menu and set the "Marker topic" field to :
- to view the recorded points: "visualization_marker".
- (rolling robots only) to view the paths travelled: "path_coverage_marker"
To start ronoco refer to the Getting Started page
Getting started
Quick-start
To launch the project with a manipulator robot, simply run the following command
roslaunch ronoco manipulator.launch commander:=string compliant_mode:=string end_effector:=string
With as argument :
- commander: the name of the move_group in MoveIt
- compliant_mode: manual if the robot can go into compliant mode manually, None if the robot cannot go into compliant mode, or the name of the service to put it in and out of compliant mode.
- end_effector: the name of the service to manipulate the effector, e.g. "wsg_50_driver/move". It is not necessary to fill in this field
To start the project with a rolling robot, simply run the following command
roslaunch ronoco rolling.launch namespace:=string
With as argument :
- namespace: the namespace for your robot without last / (default " ")
Whether the robot is a rolling robot or a manipulator arm, once ronoco is launched it is necessary to establish the connection with the robot. For example in the case of a ur3 in simulation it will be necessary to launch
roslaunch ur3_moveit_config demo.launch config:=true
in parallel to ronoco manipulator. For more details please refer to the different examples.
Manual start
To use ronoco it is necessary to launch the ROS modules corresponding to your robot and then the different modules of ronoco.
Regarding the launching of ROS modules the procedure is different for each robot, to make ronoco work it is necessary to have a roscore and Moveit running. See the different examples on Poppy Ergo Jr or Universal Robots 3 for more details.
First set parameters in rosparam
#for manipulator arm
rosparam set commander string
rosparam set compliant_mode string
rosparam set end_effector string

#for rolling roboto
rosparam set namespace string
It is then necessary to launch the three modules.
# Launching of nodered in a terminal
node-red
# Launching of ronoco-vm in another terminal
cd $HOME/catkin_ws/src/ronoco/ronoco-vm/
python3 ronoco_vm/run.py
# Launching of ronoco-ui in another terminal
cd $HOME/catkin_ws/src/ronoco/ronoco-ui/
npm start
Once all the modules are running go to your localhost:8080 and you will arrive at the ronoco page:

How to use it
This page explains how to use the application to control a robot. It is divided in 2 parts, the first one explains how to use the different buttons of the control interface. The second part explains how to create behaviour trees and the specificities of the different blocks.
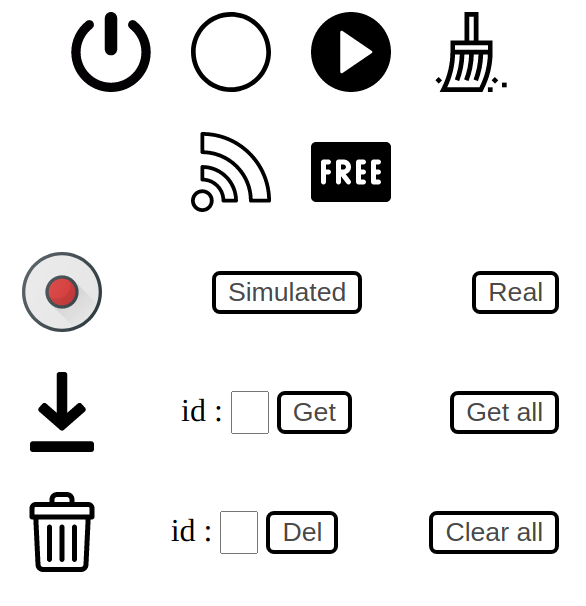
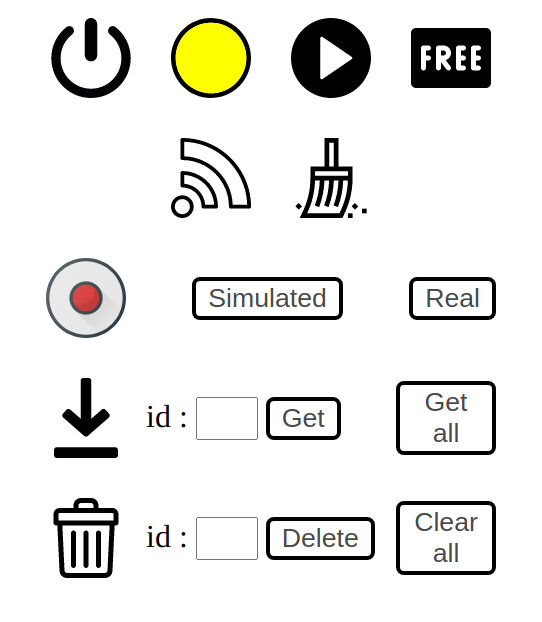
Control Interface
Control Interface
 Allows to stop the application
 This button asks the server to execute the last behaviour tree deployed from Node-RED
 Enables the robot to be set to compliant mode. This button can only be used for a robot that has a service to set it to compliant mode (for manipulator arm only)
 Allows connecting to the commander passed in parameter when the status of ronoco is red (for manipulator arm only)
![]() Clear logs in ronoco-ui
Clear logs in ronoco-ui
 This group of buttons allows you to record points in the environment. There are two recording modes either via the simulated button which records the position of the interactive marker. Or via the real button which records the actual position of the robot.
 This group of buttons allows you to view the different registered positions. It is possible to consult a specific position by filling in the id field and then pressing get or to consult all the registered positions by using the get all button.
 This group of buttons allows you to delete the different registered positions. It is possible to delete a specific position by filling in the id field and then pressing delete or delete all registered positions by using the clear all button
If the project is launched in rolling robot mode, the interface will display an additional object allowing remote operation

Teleoperation with rolling robot
States circle
 Represents the status of the server, when it is empty it means that the client has not yet received any information from the server. It is probably still loading.
 When it is black (here white) it means that at least one request to the server has not been answered and therefore the server is not running or is in error
Manipulator arm
 When it is red, it means that it is not possible to reach the commander. Check that MoveIt is running and that the order passed as a parameter is the right one, then click on the connect button
 When it is orange it means that ROS is not working as expected. The source of the problem is either the absence of roscore (the rosout/get_loggers service is not available) or the absence of moveit (the move_group/get_loggers service is not available). In this state ronoco is not usable
 When it is yellow it means that Rviz is not communicating the position of the interactive marker. If rviz seems to be working correctly on your machine, simply move the interactive marker to fix the problem. In this state ronoco is usable but the "simulated" button will produce an error
 When it is green it means that ronoco is fully usable
Rolling robot
When it is red, it means that it is not possible to communicate with ros. The source of the problem is obviously an absence of roscore
When it is orange it means that it is not possible to communicate properly with the navigation topics. If you are in the mapping phase, this is normal. If not, check the status of the navigation entity.
When it is yellow it means that rviz is not communicating properly. If rviz seems to be working correctly on your machine, simply publish a point with the "publish point" tool to fix the problem. In this state ronoco is usable but the "simulated" button will produce an error
When it is green it means that ronoco is fully usable
Area for creating behaviour trees

Area for creating behaviour trees
The behaviour tree creation area is an instance of Node-RED it is necessary to have the Ronoco specific Node-RED palette installed to use the application. Refer to the installation page
⚠️ Ronoco is not compatible with the native Node-RED blocks, only the blocks of the ronoco-nodered palette are usable. You can make the native blocks disappear by clicking on the three horizontal bars at the top right, then Manage Palette and finally click on disable all for the node-red palette.
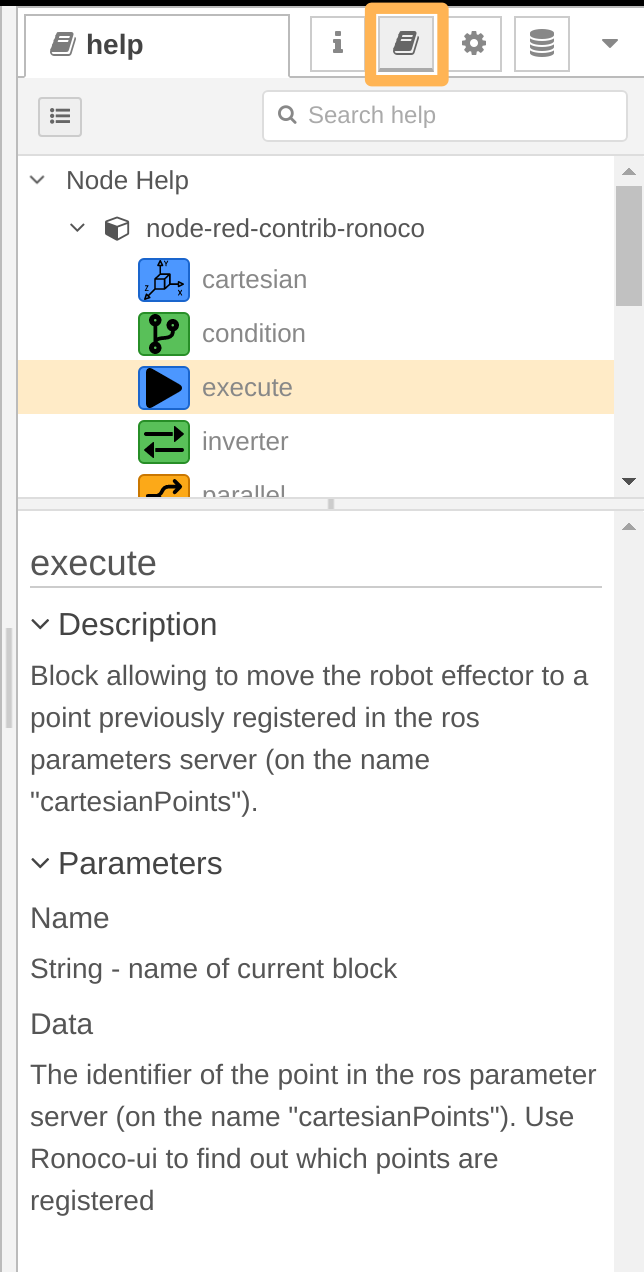
This section explains how to create a tree interpretable by ronoco-vm and run it. To learn how to create behaviour trees, refer to the associated page. For the documentation of each block, you can access it directly from ronoco or from the behaviours documentation.

Access to block documentation from Ronoco
 To create Ronoco interpretable trees any tree must start with a root block and must contain at least one leaf (blue coloured blocks), a tree not starting with a root block will simply be ignored.
The root and decorators blocks (green blocks) must be followed by a single child.
The sequence, selector and parallel blocks accept multiple children.
All blocks (except the root block) can be the child of multiple blocks.
The behaviour trees are read from left to right and from top to bottom. If two child blocks of the same block are placed at the same height, an error will be raised.
A worksheet can contain multiple trees identified by their root block. If this is the case, the trees will be executed according to the height of their root block on the sheet (from top to bottom)
To execute a behaviour tree with ronoco it is necessary to click on the deploy button at the top right of the window and then on the play button of the control interface.
How to create a behaviour tree
This page is an introduction to the behaviour trees used in Ronoco to define programs. It is inspired by Robotic Sea Bass - Introduction to Behavior Trees, and the documentation of py_trees
What is a Behaviour Tree ?
There are several abstractions to help design complex behaviors for an autonomous agent. Generally, these consist of a finite set of entities that map to particular behaviors or operating modes within our system, e.g., “move forward”, “close gripper”, “blink the warning lights”, “go to the charging station”. Each model class has some set of rules that describe when an agent should execute each of these behaviors, and more importantly how the agent should switch between them.
Behavior trees (BTs) are one such abstraction, which I will define by the following characteristics:
- Behavior Trees and trees : They start at a root node and are designed to be traversed in a specific order until a terminal state is reached
- Leaf nodes are executable behaviours : Each leaf will do something, whether it's a simple check or a complex action, and will output a status (success, failure or running). In other words, leaf nodes are where you connect a BT to the lower-level code for your specific application.
- Internal nodes control tree traversal: The internal nodes of the tree will accept the resulting status of their children and apply their own rules to dictate which node should be expanded next.
Behaviour Tree Terminology
Let's dig into the terminology in behaviour trees.
At a glance, these are the types of nodes that make up behaviour trees and how they are represented graphically
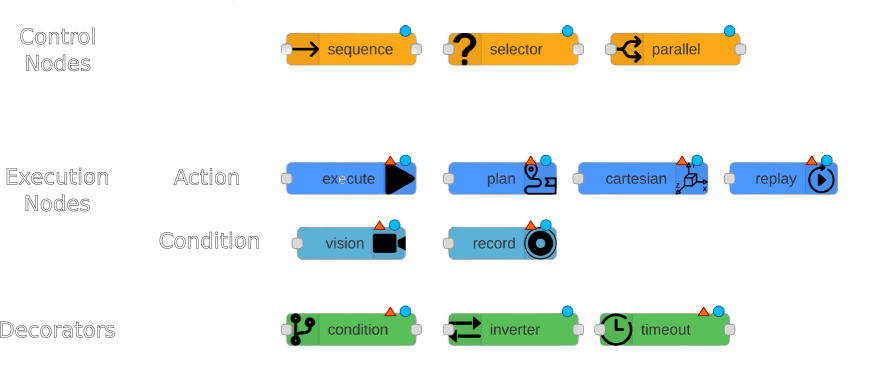
Behaviour trees execute in discrete update steps known as ticks. When a BT is ticked, usually at some specified rate, its child nodes recursively tick based on how the tree is constructed. After a node ticks, it returns a status to its parent, which can be Sucess, Failure, or Running.
Execution nodes, which are leaves of the BT, can either be Action or Condition nodes. The only diffrence is that nodes can only return Success or Failure within a single tick, whereas action nodes can span multiple ticks and can return Running until they reach a terminal state. Generally, condition nodes represent simple checks (e.g., "is the gripper open ?") while action nodes represent complex actions (e.g. "open the door").
Control nodes are internal nodes and define how to traverse the BT given the status of their children. Importantly children of control nodes can be execution nodes or control nodes themselves. Sequence, Selector and Parallel nodes can have any number of children, but differ in how they process said children. Decorator nodes necessarily have one child, and modify its behavior with some custom defined policy.
- Sequence nodes execute children in order until one child returns Failure or all children returns Success
- Selector nodes execute children in order until one of them returns Success or all children return Failure.
- Parallel nodes will execute all their children in "parallel". This is in quotes because it's not true parallelism, at each tick, each node will individually tick in order. Parallel nodes return Success when at least one child nodes have succeeded, and Failure when all child nodes have failed.
- Decorator nodes modify a single child node with a custom policy. For example "inverter" decorator will change Success to Failure and vice-versa. To see all available decorators refer to the Ronoco Node-RED documentation.
Examples
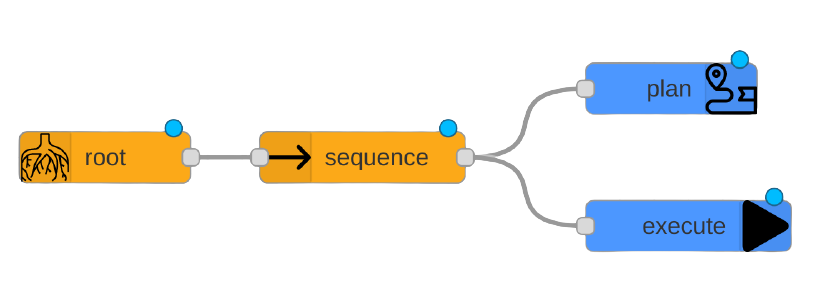
In Node-RED the behaviour trees are read from left to right and from top to bottom. In the first example, the "root" node is read first, then "sequence", then "plan" and finally "execute".
Let's start with a simple example, a sequence to plan a path to a point and then execute it. If the planning to the point succeeds then the execution will be done. However, if the planning fails, the sequence will be interrupted and the execution will not take place.
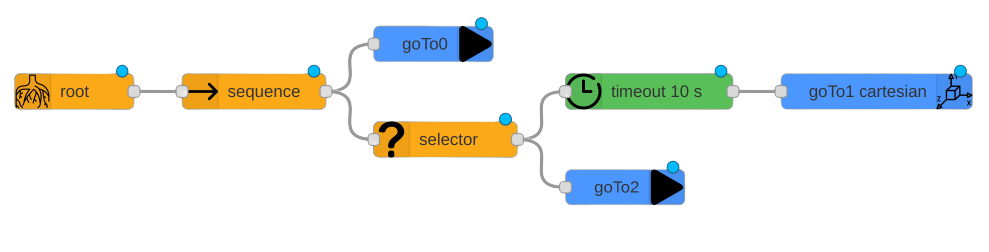
In this more complete example we will want to go to the original position and then perform a Cartesian move to position 1 in less than 10 seconds otherwise go to position 2.
To do this we start with a sequence of two children. The first one asks to move to the home position, then if the execution is successful we introduce a two-child selector. The first one asks to perform a Cartesian move to position 1, it is accompanied by a timeout decorator set to 10 seconds. If the timeout is exceeded or the move is not feasible then this first child returns a failure. At this point the selector will execute its second child consisting of moving to position 2. If the first child returns a success the selector does not need to execute its second child and the execution of this tree ends.
Examples on robots
This section provides examples of how ronoco works on different robots.
Manipulator arm
Rolling robot
Example on Poppy Ergo Jr
This page presents a complete use of ronoco on a poppy ergo jr it uses the resources of learn.e.ros4.pro concerning the Poppy Ergo Jr.
It is necessary to have a ROS installation, a ROS workspace and ronoco to follow this page. Refer to the installation guide if necessary.
Prepare Poppy Ergo Jr
Start by assembling your robot, following the steps for ROS if applicable, then configure your motors
Download the ROS image to flash an SD card. To flash the image to an SD card: + Extract the compressed .zip or .7z file to a folder on the computer + Use the software etcher (or equivalent) + In Etcher, "Flash from file", select the image file and the destination (the SD card) and validate
To connect the robot in Wifi : + Insert the SD card of the robot in question in your workstation and open the partition named boot + Download the file wpa_supplicant.conf in boot and modify it to fill in the right wifi password inside. + Download the file wpa_supplicant.conf in boot and modify it to fill in the right wifi password inside + Create an empty file named .ssh in the same place in the boot. + Type the command sync and cleanly assign the SD card
These 2 files wpa_supplicant.conf and .ssh will be deleted the next time the robot is started, indicating that the Wifi connection request has been accepted. It is therefore normal that you will not find them when you look at the boot content again after the first start of the robot.
In case of problems, it is possible to connect an HDMI display to the Raspberry Pi, the network manager is on the top right.
The Wi-Fi connection also works with Android and iOS mobile access points.
Make sure that the ROS_MASTER_URI on your workstation and on your poppy point to the same address. If not, modify and source your .bashrc.
The controller is already on the robot. You can connect directly to the robot and start it. If you have chosen to point the ROS_MASTER_URI at your workstation, do not forget to run a roscore before
ssh pi@poppy.local
roslaunch poppy_controllers control.launch
Start MoveIt with a real robot
Install MoveIt then clone the ROS package Poppy Ergo Jr MoveIt Configuration, it contains the code needed to make this robot work with MoveIt :
sudo apt install ros-noetic-moveit
cd $HOME/catkin_ws/src
git clone https://github.com/poppy-project/poppy_ergo_jr_moveit_config.git
cd $HOME/catkin_ws/
catkin_make
source $HOME/.bashrc
Start MoveIt with roslaunch with the fake_execution parameter set to false to connect to the real robot:
roslaunch poppy_ergo_jr_moveit_config demo.launch fake_execution:=false gripper:=true
Rviz should start with a Poppy Ergo Jr in view corresponding to the state of your robot in real time.
⚠️ At this stage, make sure that the posture of your robot in RViz corresponds to the current posture of the real robot: the angles of the motors and the location of the rivets must correspond in every way to your real robot. It is frequent that robots are incorrectly assembled, in this case close MoveIt and go back to the assembly guide step by step to correct before continuing.
Start Ronoco
To launch the project, simply run the following command:
roslaunch ronoco ronoco.launch commander:=arm_and_finger compliant_mode:=/set_compliant
Once all the modules are running go to your localhost:8080 and you will arrive at the ronoco page:
Use Ronoco
For a full understanding of this part it is preferable to have followed the tutorials How to use it and How to create a behaviour tree
The gif below shows a use of Ronoco
Example on Universal robot
With a simulated universal robot
First, download the universal robot simulation
cd $HOME/catkin_ws/src
git clone https://github.com/fmauch/universal_robot.git
cd ..
catkin_make
source /devel/setup.bash
Then run the simulation of a universal robot
roslaunch ur3_moveit_config demo.launch config:=true
Finally, run ronoco in manipulator mode
roslaunch ronoco manipulator.launch commander:=manipulator compliant_mode:=manual
With a real ur3
This driver requires a system setup with ROS. It is recommended to use Ubuntu 18.04 with ROS melodic however using Ubuntu 20.04 with ROS noectic work also. To install ROS noetic on Ubuntu 20.04 see the relative page
First it is necessary to download and install Universal Robots ROS Driver by performing the commands below
# source global ros
source /opt/ros/<ros_distro>/setup.<bash/zsh>

# create a catkin workspace if necessary
mkdir -p catkin_ws/src && cd catkin_ws

# clone the driver
git clone https://github.com/UniversalRobots/Universal_Robots_ROS_Driver.git src/Universal_Robots_ROS_Driver

# clone fork of the description. This is currently necessary, until the changes are merged upstream.
git clone -b calibration_devel https://github.com/fmauch/universal_robot.git src/fmauch_universal_robot

# install dependencies
sudo apt update -qq
rosdep update
rosdep install --from-paths src --ignore-src -y

# build the workspace
catkin_make

# activate the workspace (ie: source it)
source devel/setup.<bash/zsh>
Prepare the robot
For using the ur_robot_driver with a real robot you need to install the externalcontrol-1.0.4.urcap see
Installing
a URCap on a CB3 robot
or
Installing a URCap on a e-Serries robot.
Prepare the ROS PC
Though this step is not necessary to control the robot using this driver, it is highly recommended to do so, as otherwise endeffector positions might be off in the magnitude of centimeters.
For this, there exists a helper script :
roslaunch ur_calibration calibration_correction.launch robot_ip:=<robot_ip> \
target_filename:="${HOME}/calibration.yaml"
For the parameter robot_ip insert the IP address on which the ROS pc can reach the robot.
Quick Start
Once the driver is built and the externalcontrol URCap is installed on the robot, you are good to go ahead starting the driver. To actually start the robot driver use one of the existing launch files
roslaunch ur_robot_driver <robot_type>_bringup.launch robot_ip:=192.168.56.101 \
kinematics_config:="${HOME}/calibration.yaml"
Where <robot_type> is one of ur3, ur5, ur10, ur3e, ur5e, ur10e, ur16e.
If everything went well you can run rosrun rqt_joint_trajectory_controller rqt_joint_trajectory_controller to check that the communication between the PC and the robot is effective.
Once this is done you can start MoveIt, to do this run the command roslaunch ur3_moveit_config ur3_moveit_planning_execution.launch. Once MoveIt is running it is possible to start rviz via the command roslaunch ur3_moveit_config moveit_rviz.launch config:=true.
There have been problems with controllers running the path from rviz, for more information see the logs
Using ronoco with a universal robot
Once the installation procedure of ROS on a universal robots model is completed, you just have to start ronoco by following the Quick Start with the followings arguments :
- commander: manpiulator
- compliant_mode: manual
Once started you can use ronoco in the usual way.
Limitations
Universal robots do not support the use of "free mode" at the same time as the execution of a program, i.e. when executing the ExternalControl block it is not possible to use the "free mode" function. Thus the record and replay blocks cannot be used on a universal robot.
Example on Kuka KR6
This guide explains how to use the kuka KR6 at eirlab and ronoco on it.
Mise en garde
Please note that the Kuka KR6 R900 arm is not a cobot. It is necessary to take every precaution to avoid injury. When the arm is activated never enter its working area. Ideally, a second person should be assigned to the external emergency stop button when operating the arm.
To begin, turn the green on/off switch on the controller to the on position. The kuka will initialise for a few minutes.
Once initialized you will have access to the kuka control interface.
Manual control
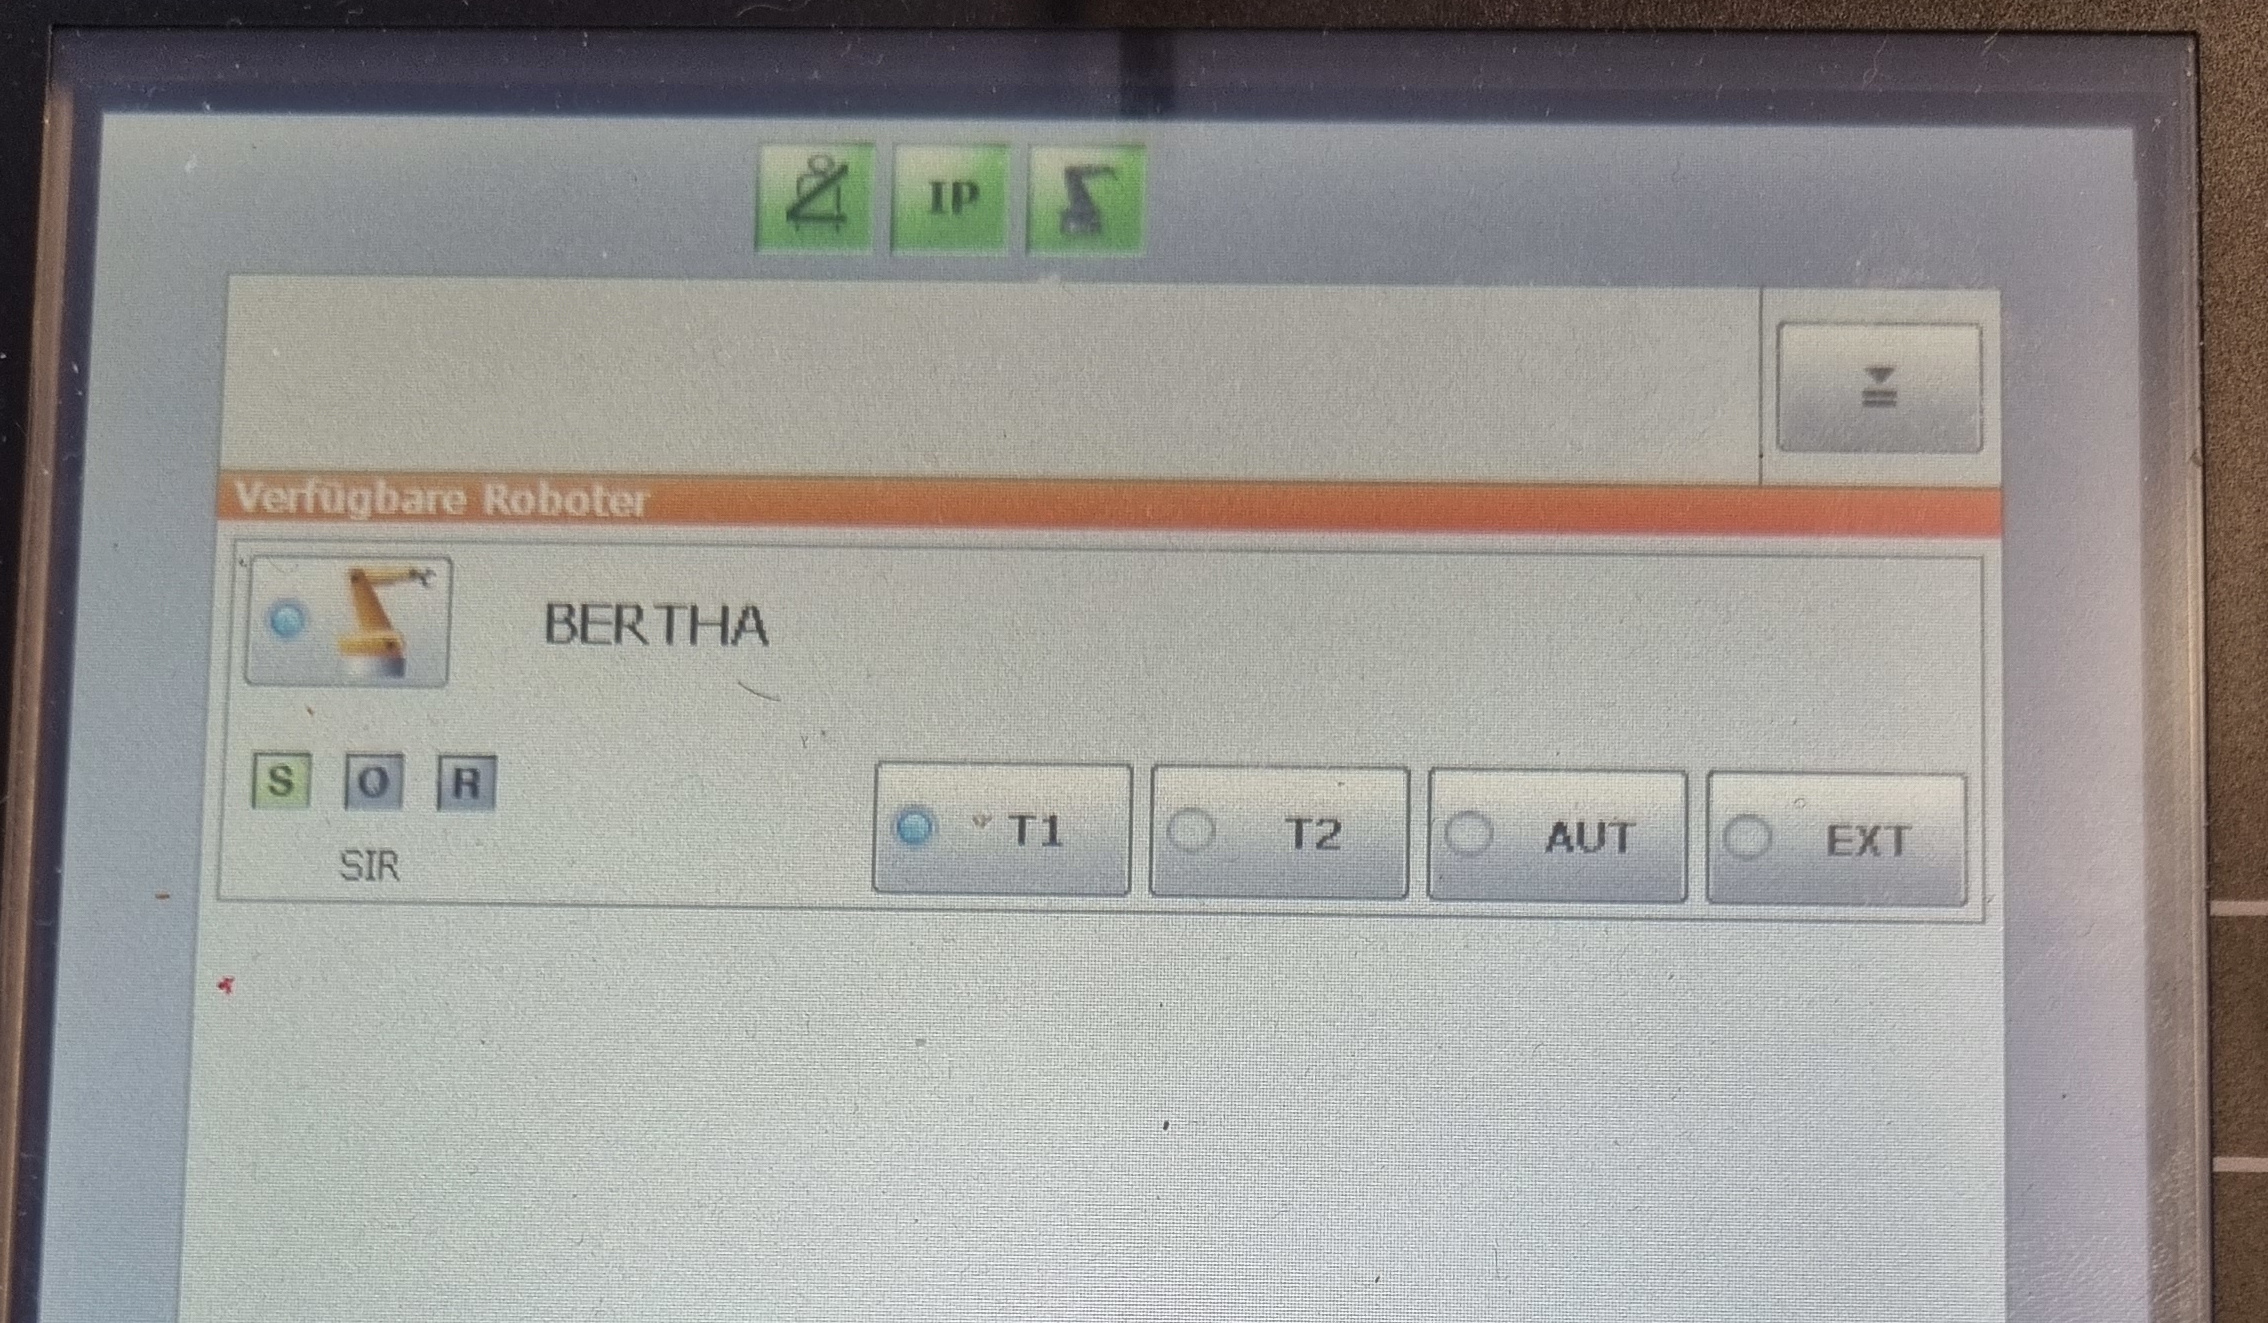
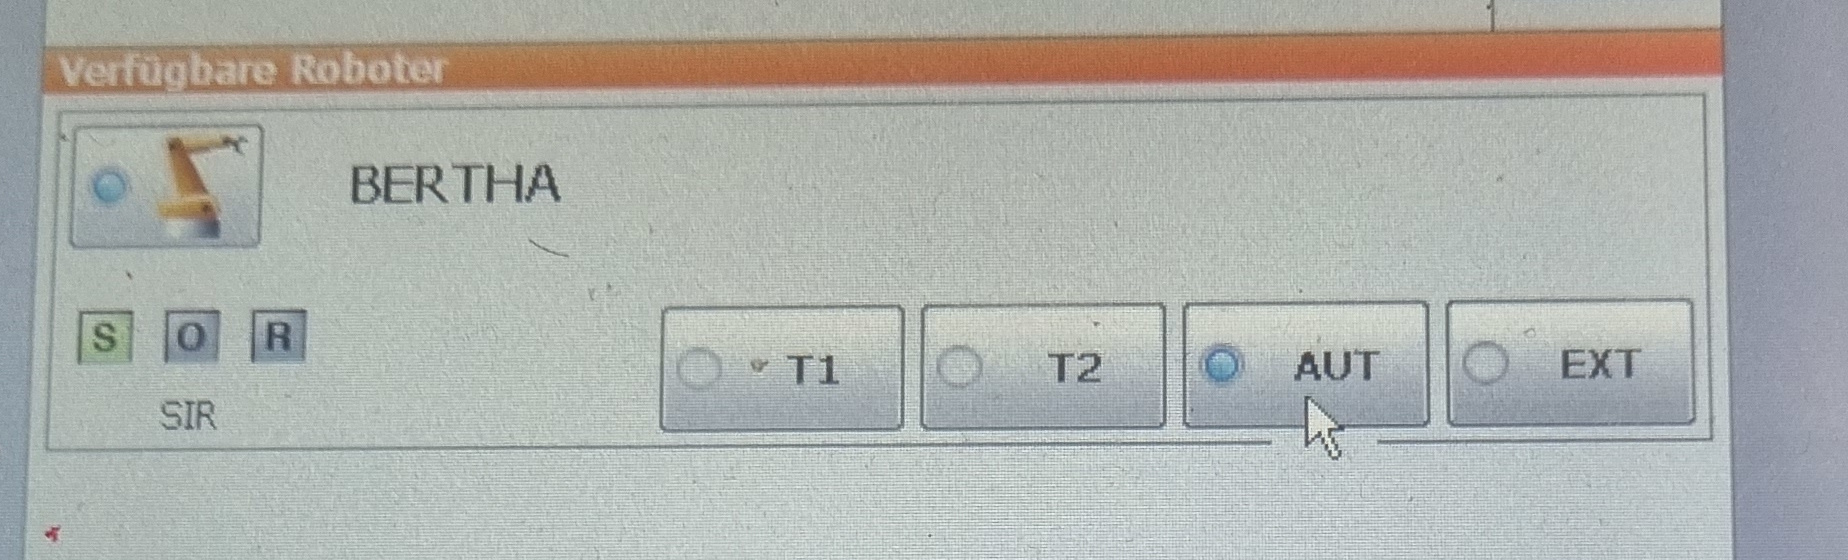
To control the robot in manual mode start by placing it in T1 mode. To do this, turn the key on the control panel, press T1 and then turn the key over.
Once in T1 mode, unlock the emergency stops. Click confirm all on the control panel
then click on the operator acknolegment button on the back of the controller (without going through the kuka work area!)
At this point the kuka is ready to be controlled manually. Simply hold one of the white buttons on the back of the tablet with your finger and then move the various joints with the 6 buttons on the side of the tablet.
Automatic control
To run a program on the kuka it is necessary to switch it to automatic mode.
⚠️ Automatic mode means that you do not need to hold down a button to make the kuka move as in T1 mode, when using this mode always have an emergency stop button in your hands. To switch to automatic mode turn the key, click aut and then turn the key back.
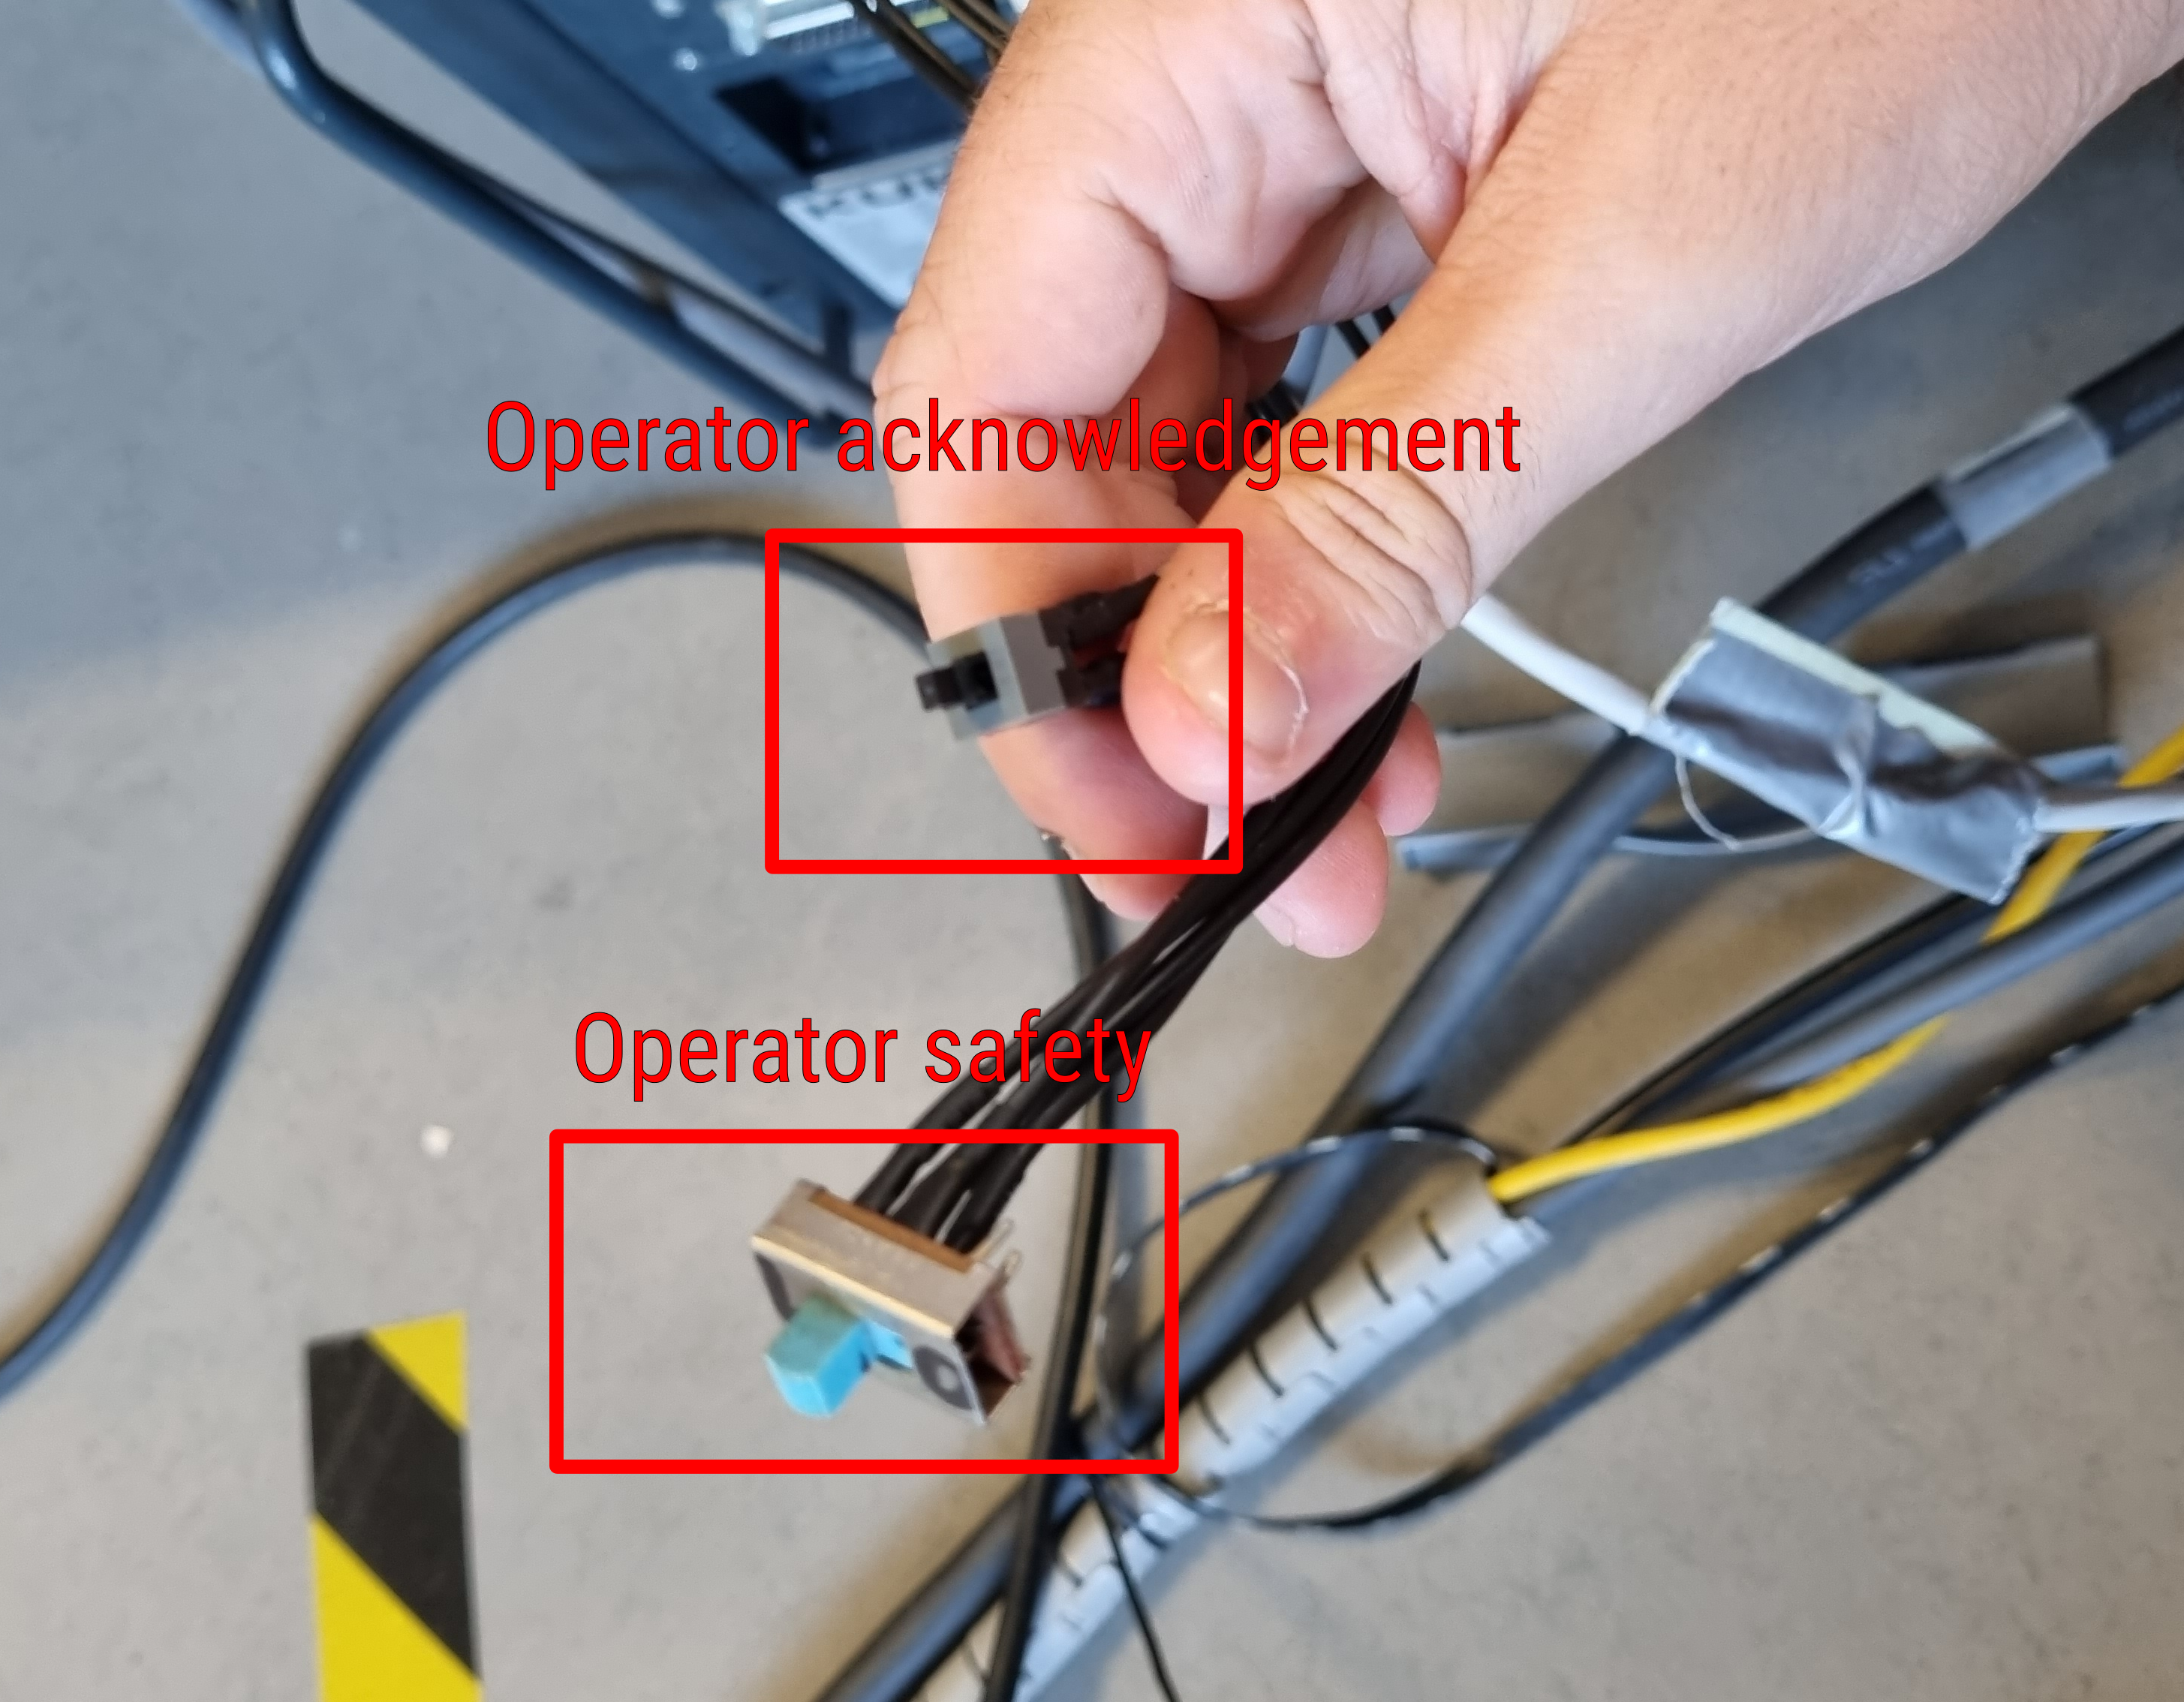
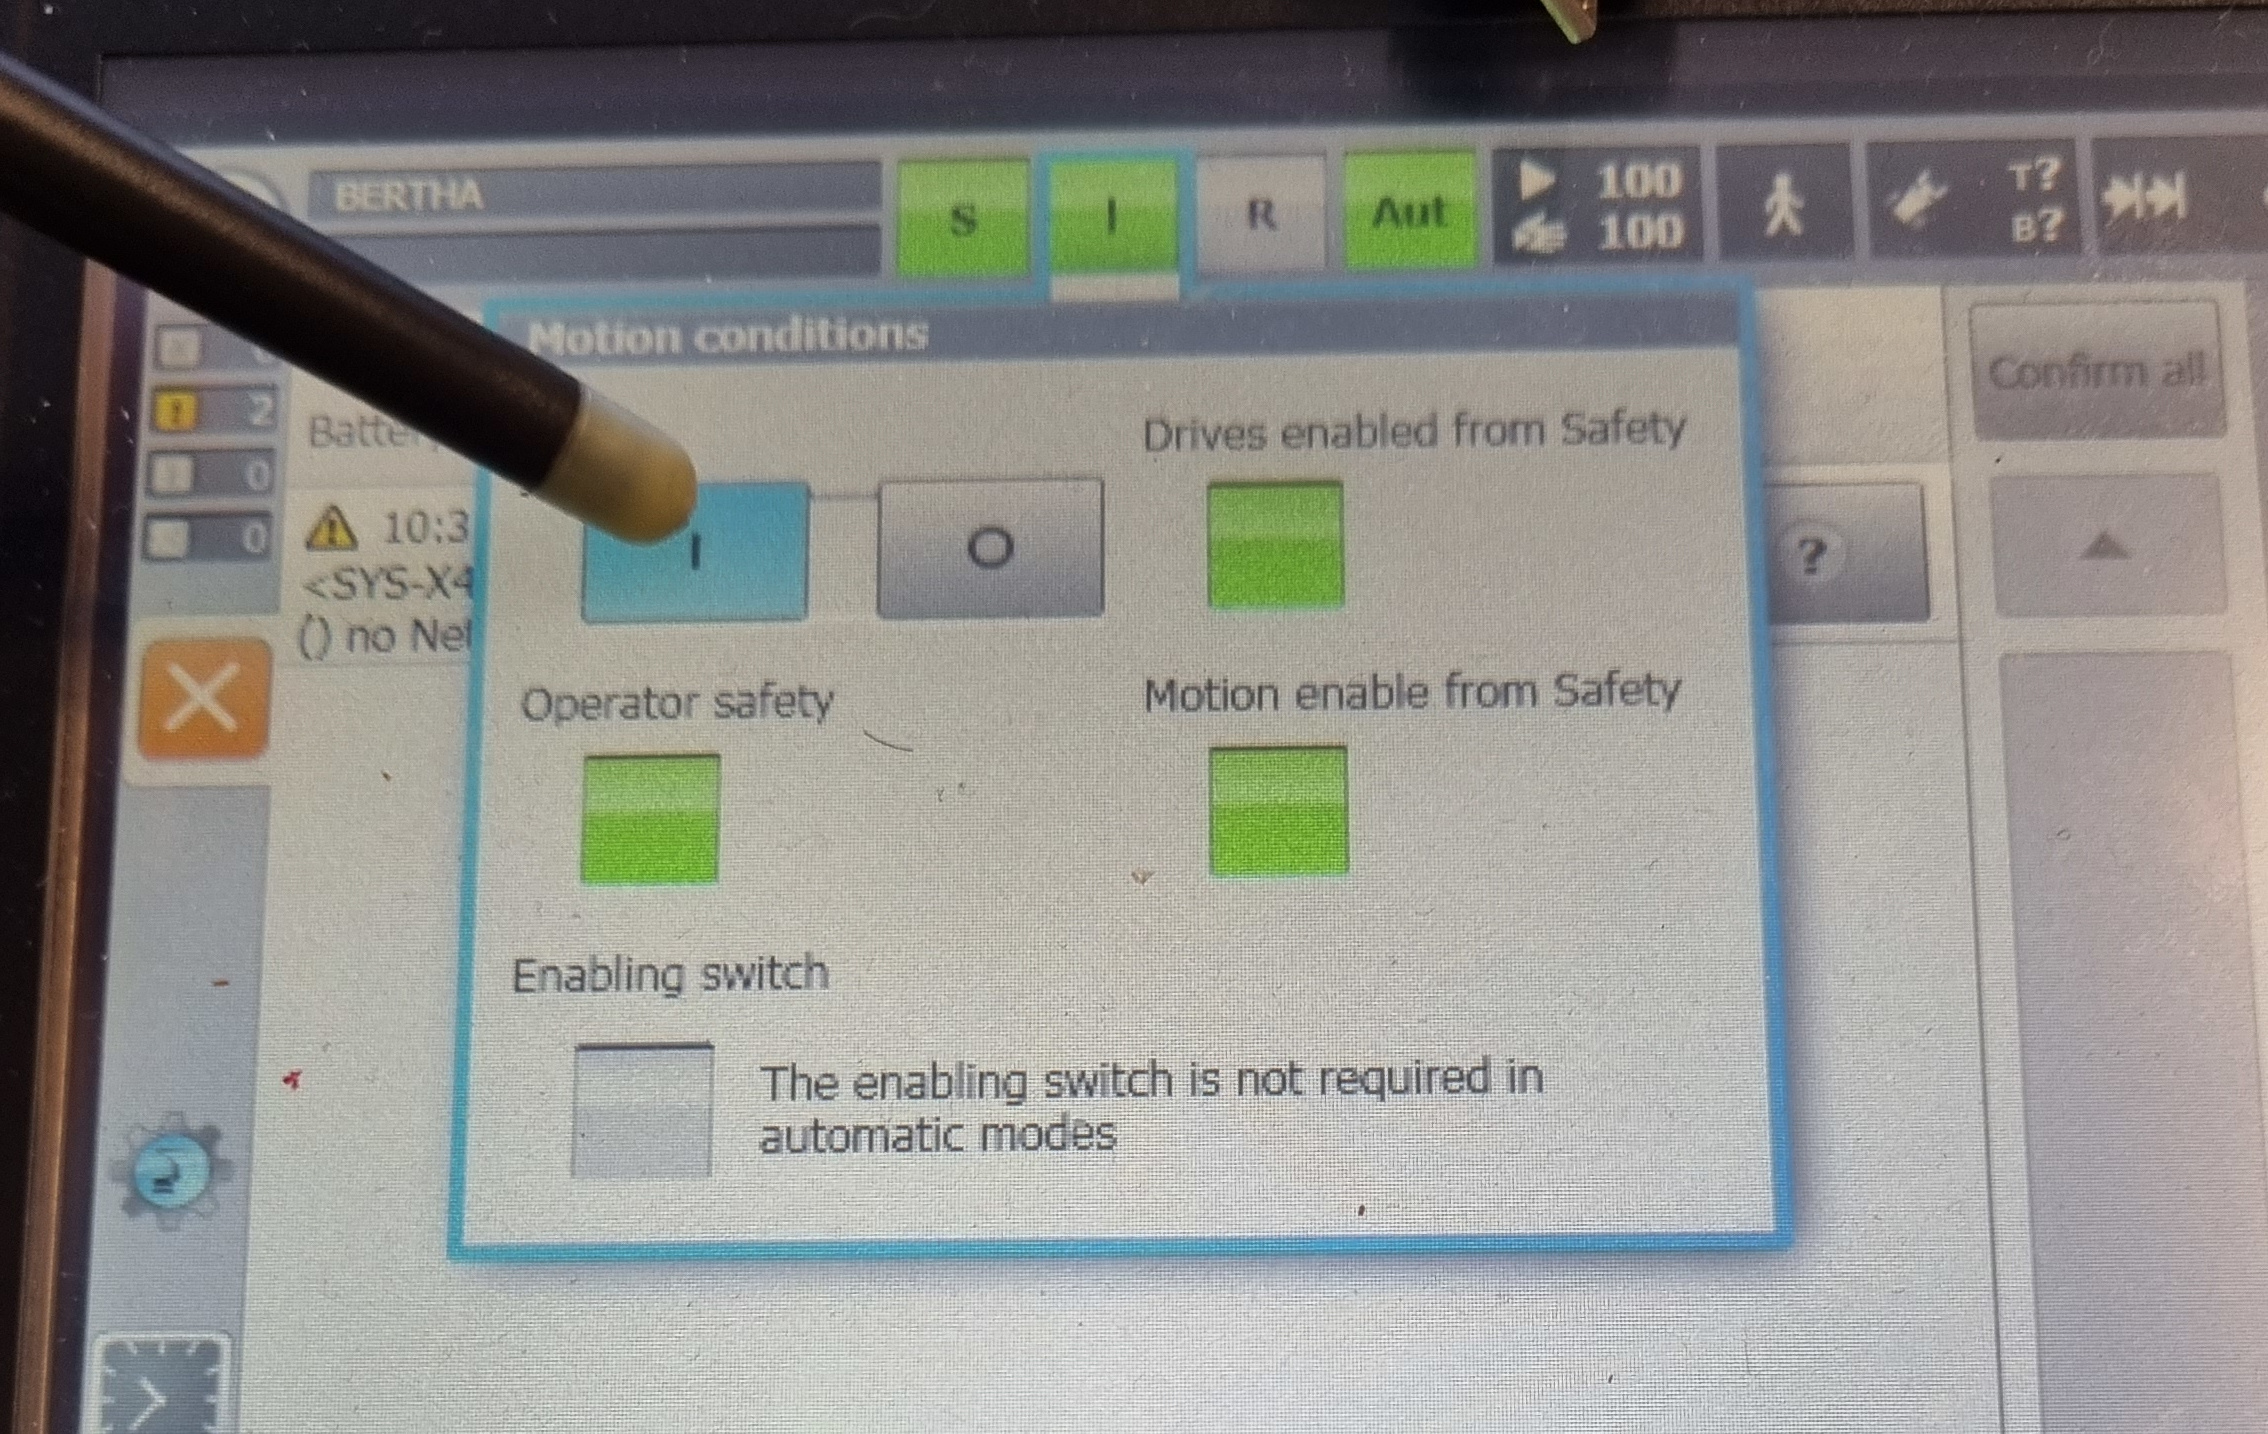
Once in automatic mode, unlock the emergency stops, set the operator safety switch to 1 and click on operator acknowledgement (without going through the kuka work area!). Then start the controller by clicking on the I (or O) at the top of the tablet and then clicking on the I button
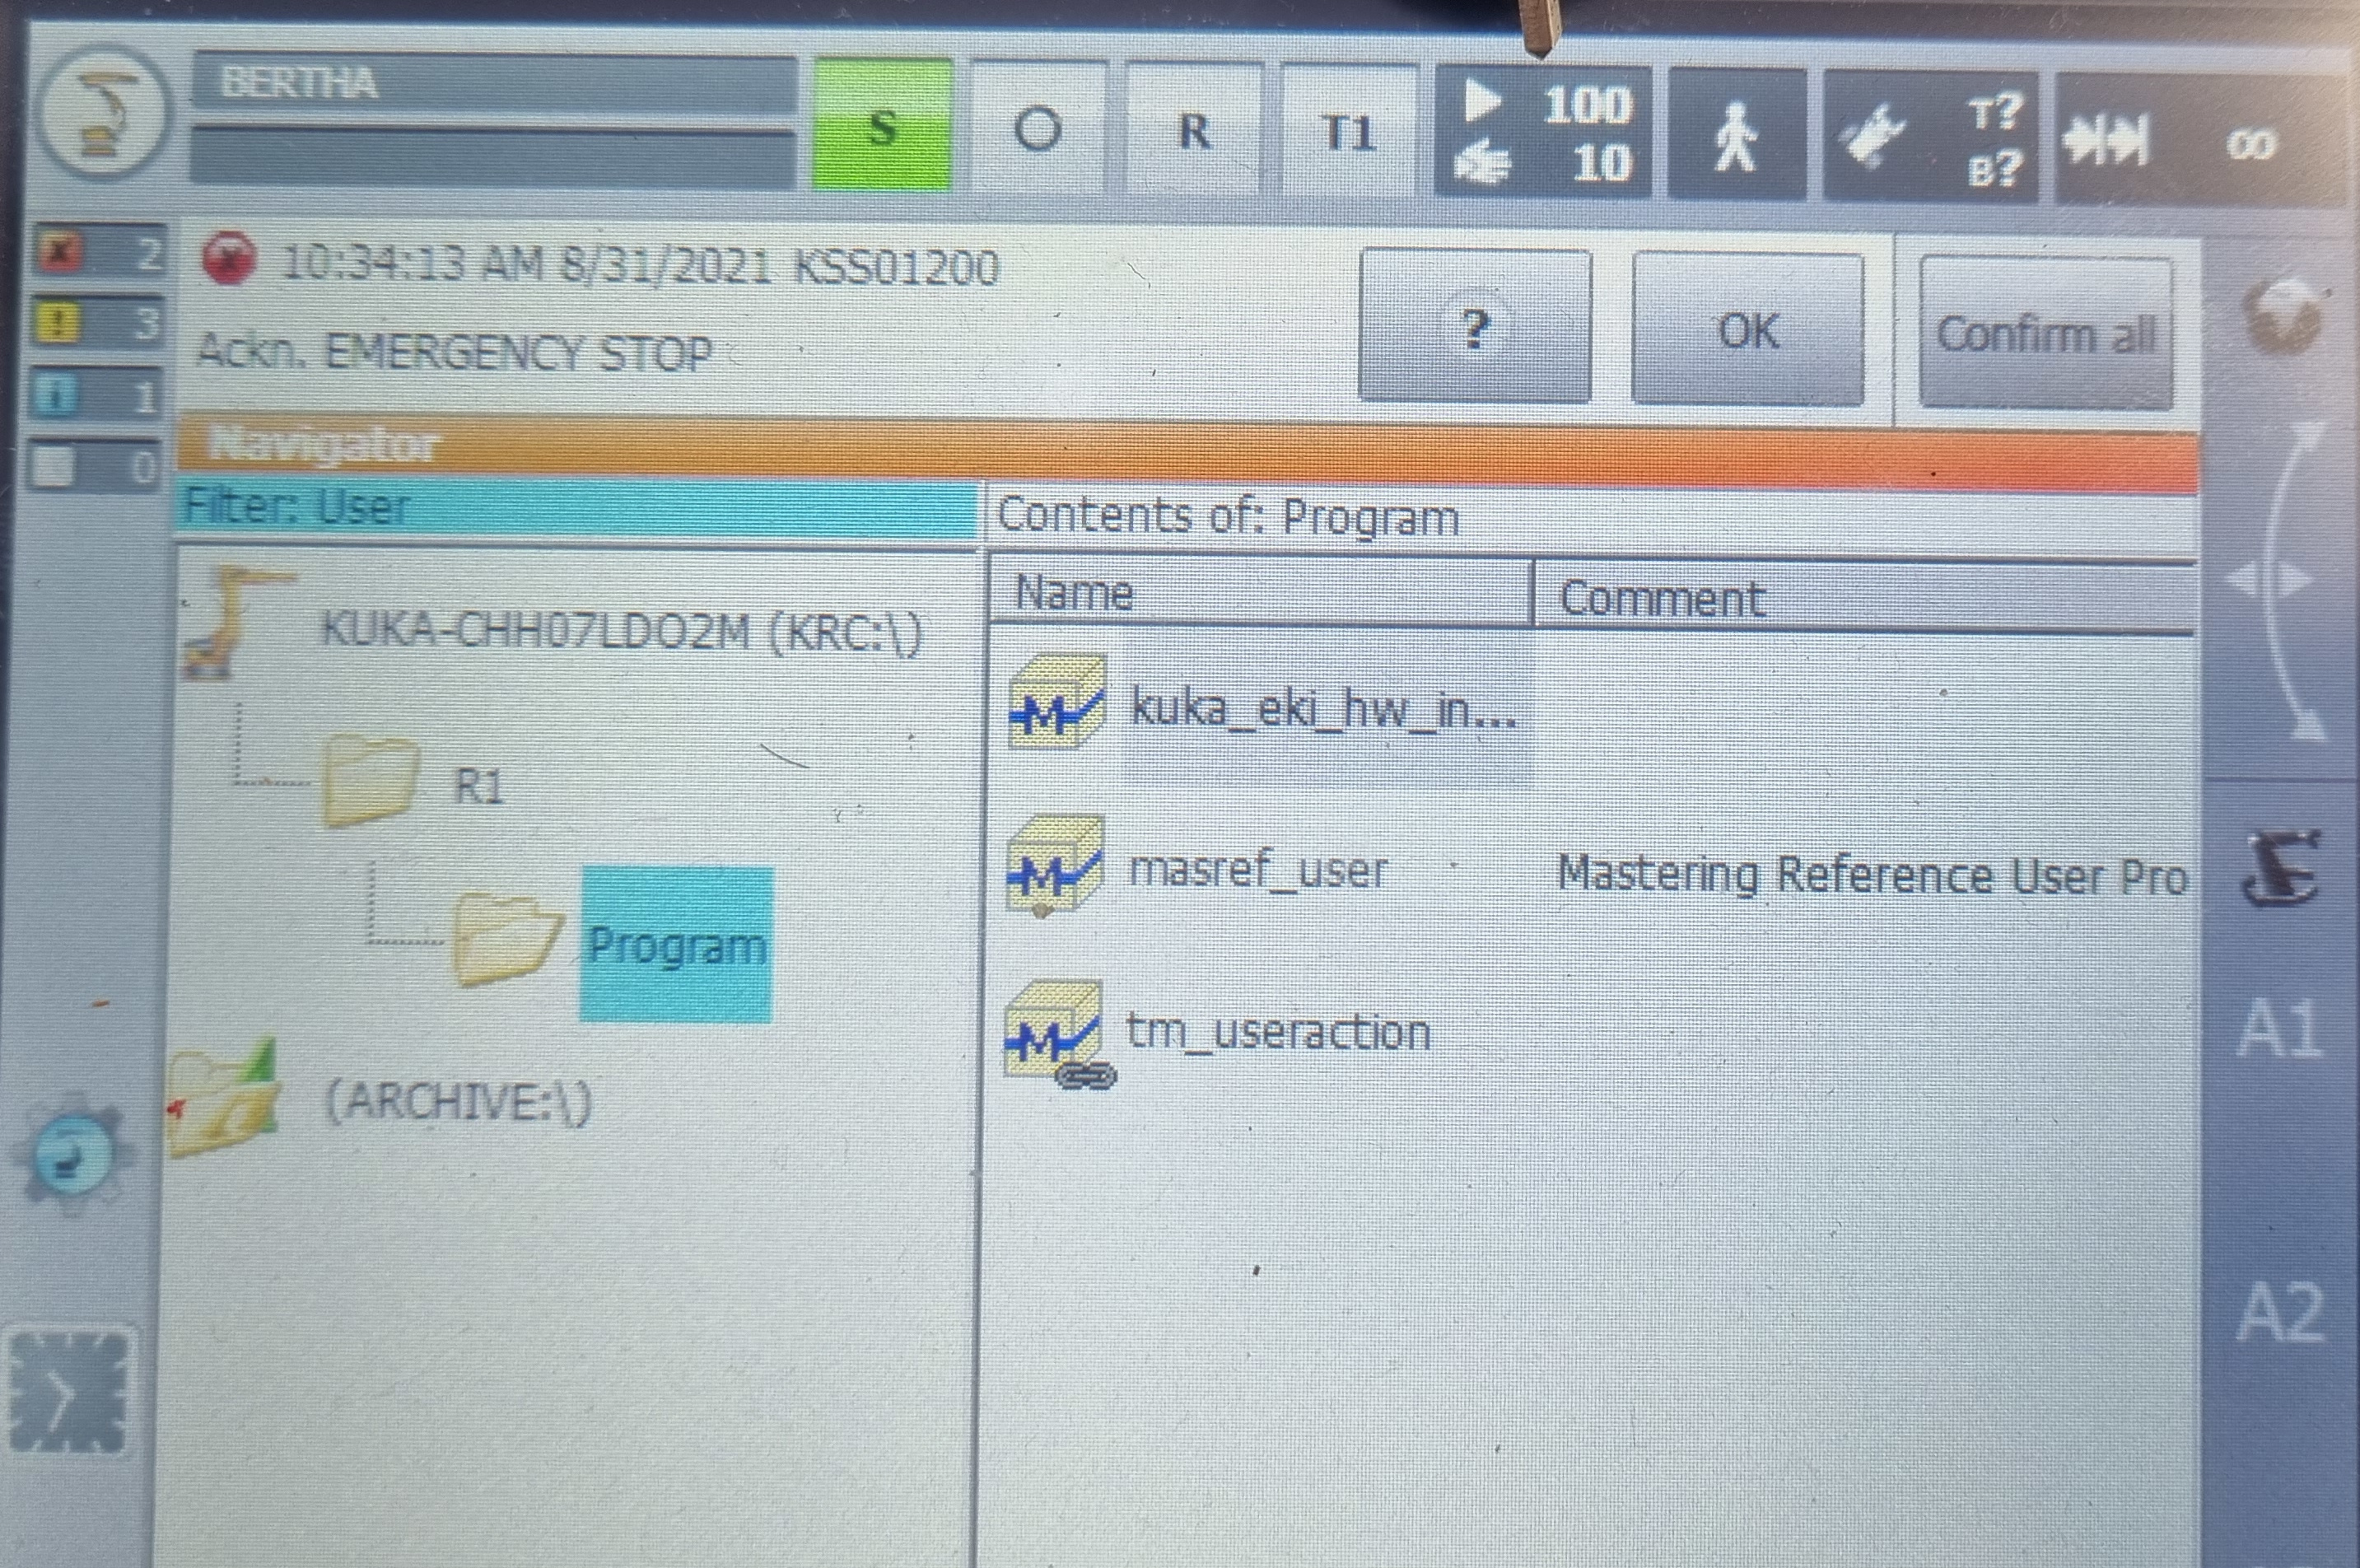
Then you have to select a program. For example, for the program kuka_eki you just have to click on it and then press the select button. Finally, to start the program, press the play button on the left of the tablet.
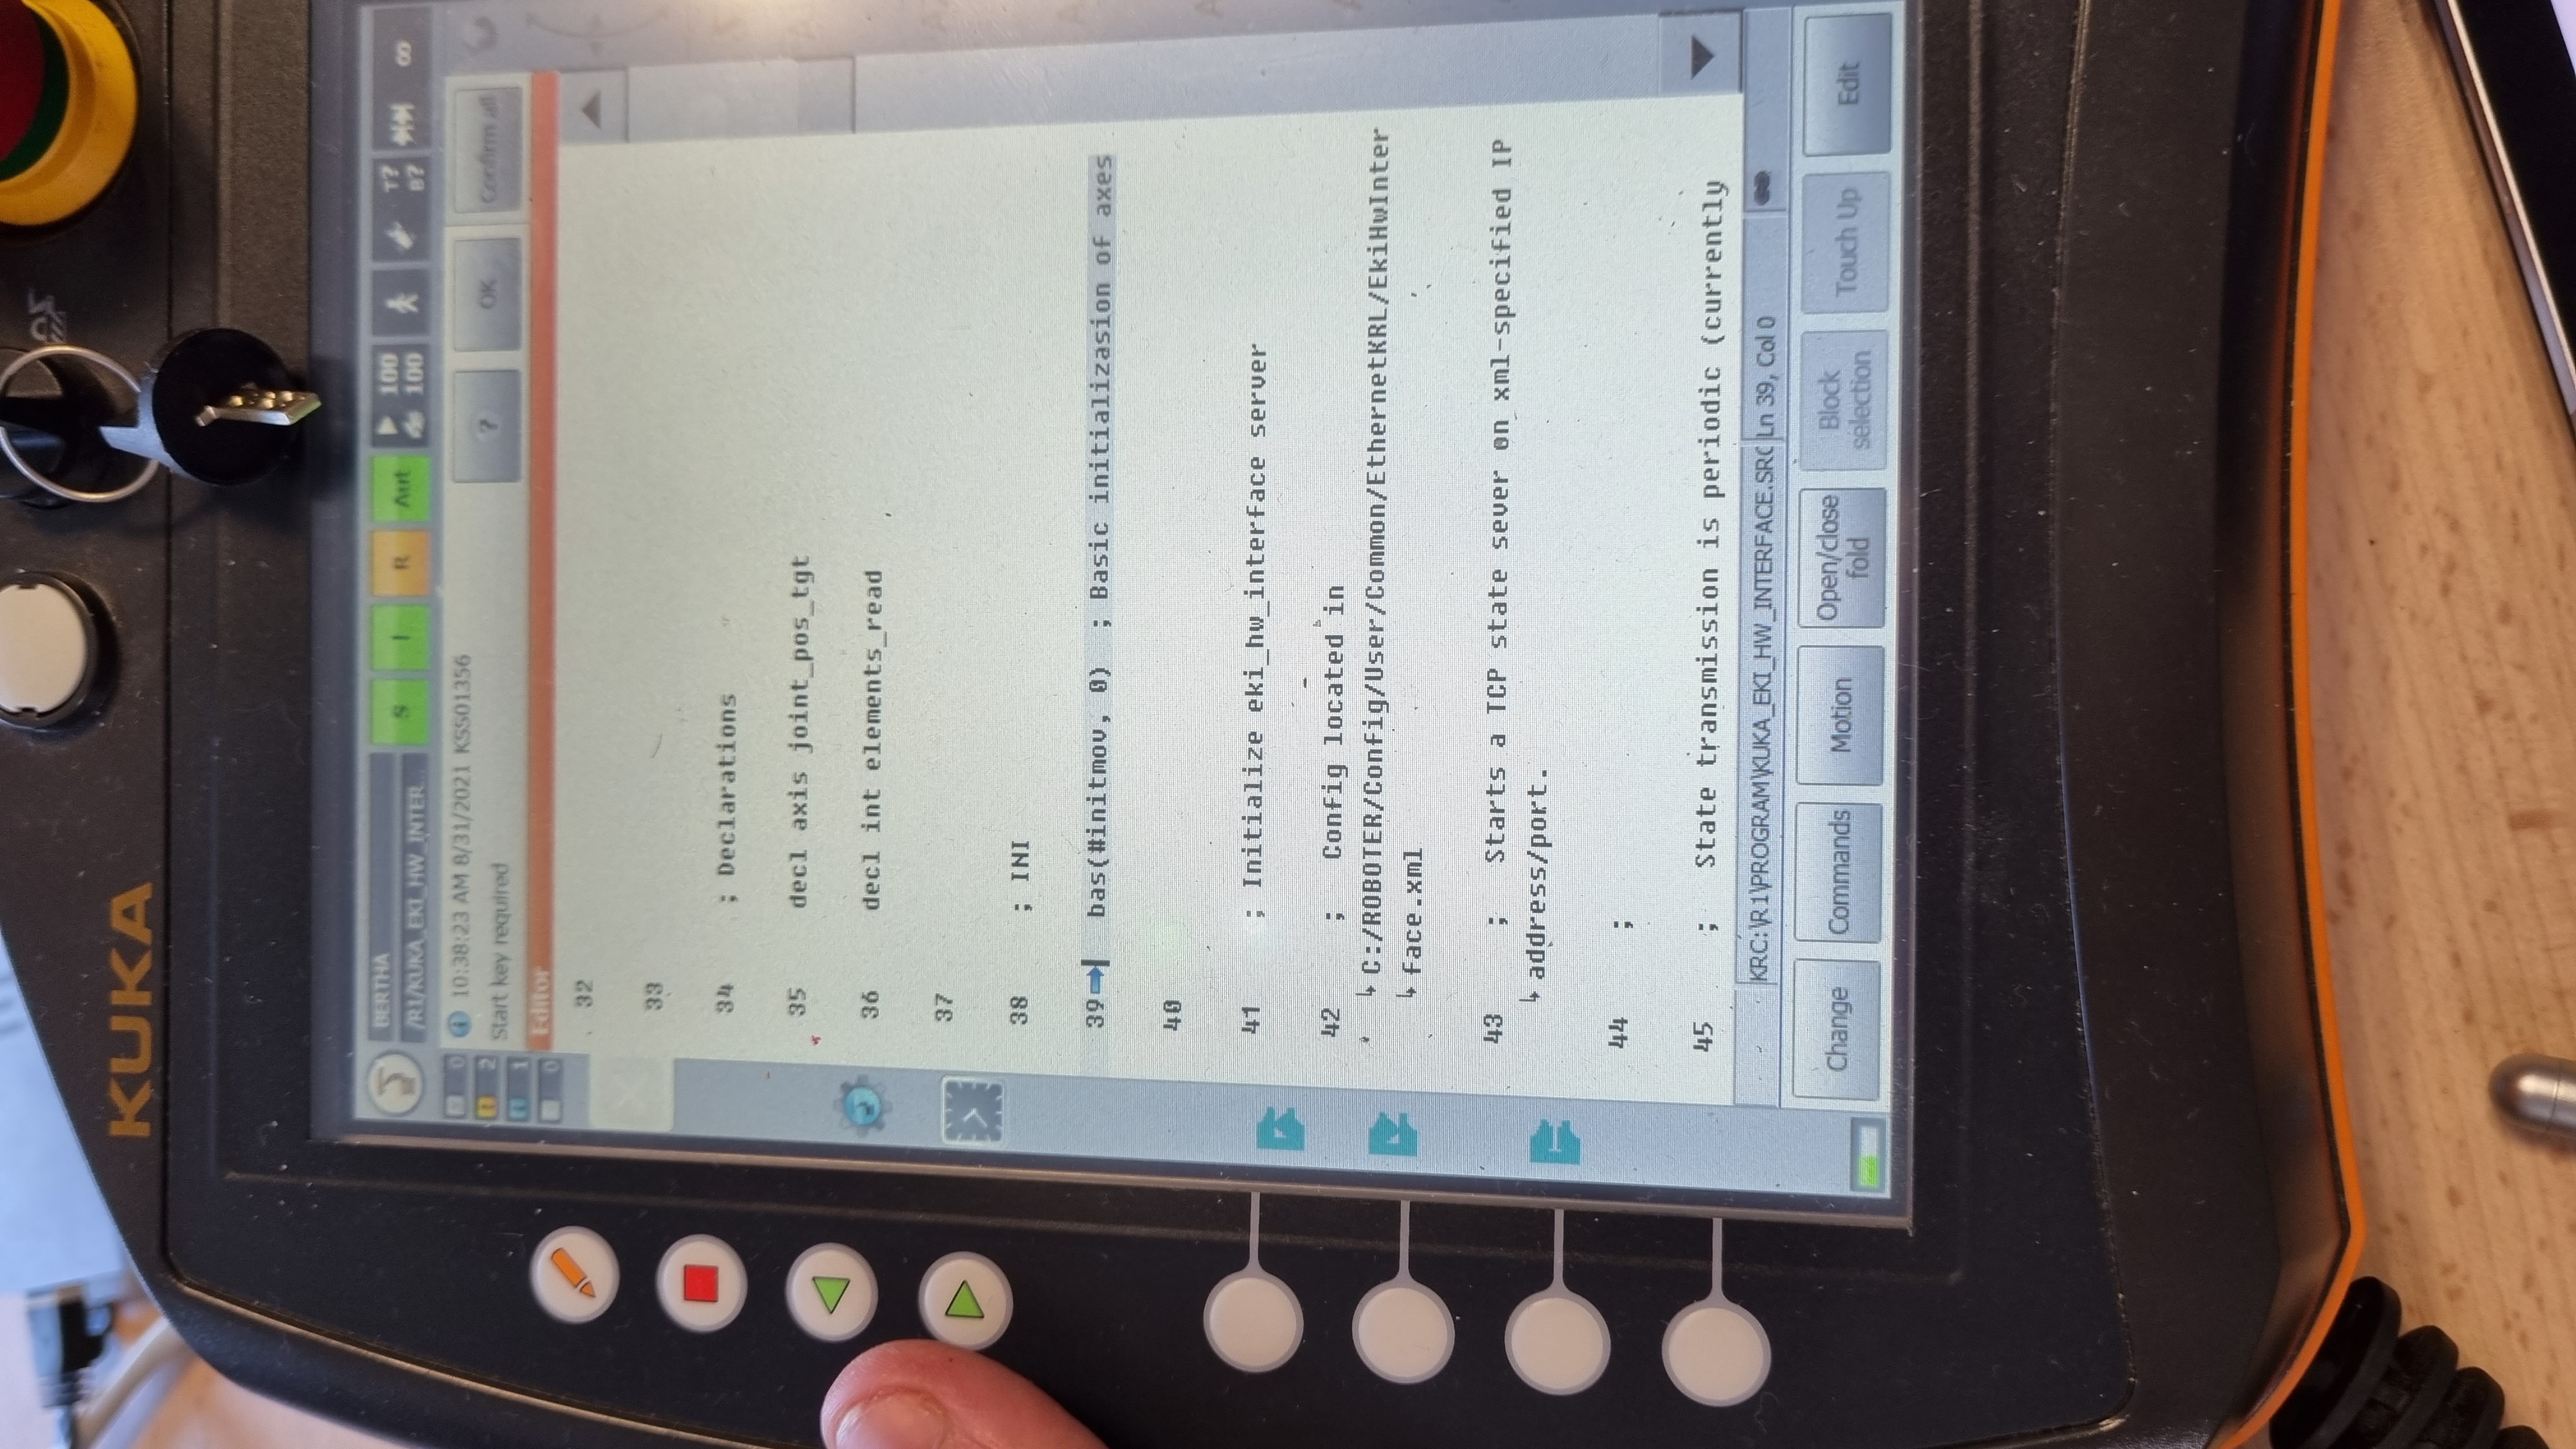
⚠️ The programme is now running independently. Please be aware of the kuka's movements and do not hesitate to press the emergency stop.
ROS
Installation
sudo apt-get install python-imaging-tk
sudo apt-get install python-tk
cd ~/catkin_ws/src/
git clone https://github.com/ros-industrial/kuka_experimental
git clone https://github.com/Bordeaux-INP/dimr-kuka
cd ..
rosdep install --from-paths src --ignore-src
catkin_make
source ~/.bashrc
If you also want to use the wsg50 effector mounted on the kuka :
cd ~/catkin_ws/src/
git clone https://github.com/nalt/wsg50-ros-pkg
cd ..
catkin_make
source ~/.bashrc
Simulation
To start the DIMR-KUKA project in simulation, type the following command. An RSI simulator is started in the background to simulate the true response of the KRC4 via the RSI module.
roslaunch dimr_kuka dimr_kuka.launch sim:=true gripper:=false
Real
Once the kuka has been put into emergency mode, connect the ethernet cable from the switch on the bottom of the kuka to your PC. Also connect the power supply to the end effector if you wish to use it. Once everything is connected you can remove the emergency stop on the kuka and run the kuka_eki program.
On your pc it is necessary to manually provide DHCP on the address 192.168.250.21/24. Remember to disable the proxy server if you have one. The kuka ip address will be 192.168.250.20 and the effector will be 192.168.250.22.
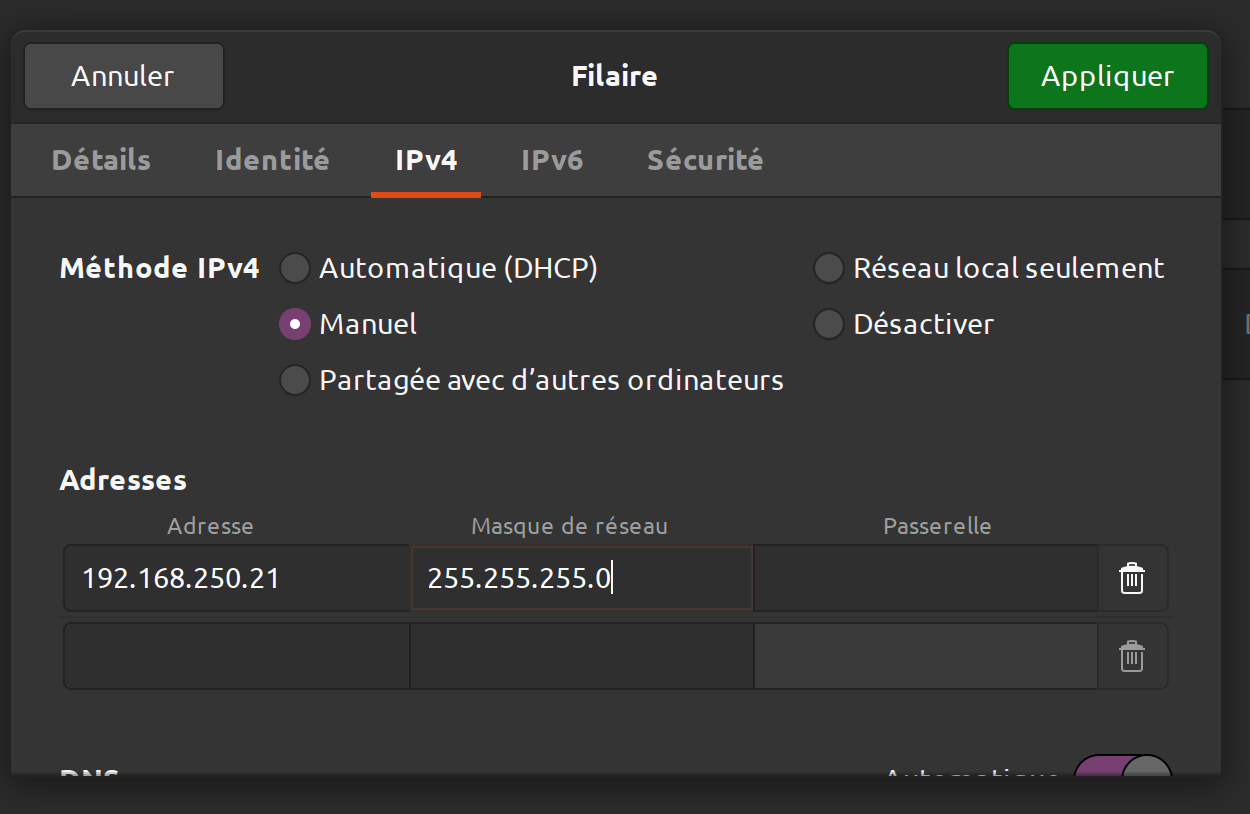
You can check the connection of all items by running the command nmap -sP 192.168.250.0/24 if everything is connected the output should be similar to this:
Starting Nmap 7.80 ( https://nmap.org ) at 2021-08-31 10:57 CEST
Nmap scan report for 192.168.250.20
Host is up (0.0016s latency).
Nmap scan report for morhost-iscsi2.iscsi.ipb.fr (192.168.250.21)
Host is up (0.00027s latency).
Nmap scan report for hangar-iscsi2a.iscsi.ipb.fr (192.168.250.22)
Host is up (0.0025s latency).
Nmap done: 256 IP addresses (3 hosts up) scanned in 16.12 seconds
You can then run the command for the kuka. You will then have access to rviz to control it.
roslaunch dimr_kuka dimr_kuka.launch sim:=false mode:=eki gripper:=false
🦾 To use the effector, it is first necessary to change the connection ip in the ros package. Open with your favorite editor the file: ~/catkin_ws/src/wsg50-ros-pkg/wsg_50_driver/launch/wsg_50_tcp.launch and replace line 5 with the line below
<param name="ip" type="string" value="192.168.250.22"/>
Once registered you can run the following command to take control of the effector.
roslaunch dimr_kuka dimr_kuka.launch sim:=false mode:=eki gripper:=true
🔧 The gripper services then start automatically, you can test the operation of the gripper with the command rosservice call /wsg_50_driver/move 50 50. If it moves everything is normal. If it responds with a 255 error then go to the 192.168.250.22 tab manual control and click on the home button you can then use the effector directly with ROS.
Ronoco
To use the kuka (and the effector) with ronoco you just have to install the project and then launch it with the following command.
roslaunch ronoco manipulator.launch commander:=manipulator compliant_mode:=None end_effector:=wsg_50_driver/move
Example on turtlebot 3 burger
First, install the necessary dependencies
sudo apt install ros-noetic-joy ros-noetic-teleop-twist-joy \
  ros-noetic-teleop-twist-keyboard ros-noetic-laser-proc \
  ros-noetic-rgbd-launch ros-noetic-rosserial-arduino \
  ros-noetic-rosserial-python ros-noetic-rosserial-client \
  ros-noetic-rosserial-msgs ros-noetic-amcl ros-noetic-map-server \
  ros-noetic-move-base ros-noetic-urdf ros-noetic-xacro \
  ros-noetic-compressed-image-transport ros-noetic-rqt* ros-noetic-rviz \
  ros-noetic-gmapping ros-noetic-navigation ros-noetic-interactive-markers ros-noetic-tf2-tools

sudo apt install ros-noetic-dynamixel-sdk
sudo apt install ros-noetic-turtlebot3-msgs
sudo apt install ros-noetic-turtlebot3
With a simulated tb3
For a simulation robot install the turtlebot simulation package
cd $HOME/catkin_ws/src
git clone -b noetic-devel https://github.com/ROBOTIS-GIT/turtlebot3_simulations.git
cd ..
catkin_maker
source devel/setup.bash
Then launch gazebo in a first terminal
roslaunch turtlebot3_gazebo turtlebot3_house.launch
You can now launch ronoco in another terminal
roslaunch ronoco rolling.launch
At this point you can choose to :
- map the environment
- navigate on an existing map
To map the environment, simply issue the command
roslaunch turtlebot3_slam turtlebot3_slam.launch
This will open rviz and the robot will start to build the environment around it. You can move it around using ronoco's directional arrows.
Once you are happy with the map, don't close the previous terminal and run the command
rosrun map_server map_saver -f ~/map
Once this program is finished you can shut down the two previous terminals and move on to navigation.
To perform the navigation run the following command
roslaunch turtlebot3_navigation turtlebot3_navigation.launch
Once rviz is open you can create behaviour trees using ronoco
With a real tb3 (ros4pro)
To control a real turtlebot 3 with the ros4pro package (refer to https://learn.e.ros4.pro/fr/navigation/turtlebot/ for more information)
First, install the ros4pro package
cd $HOME/catkin_ws/src
git clone https://github.com/ros4pro/turtlebot3_ros4pro.git
cd $HOME/catkin_ws && catkin_make
source devel/setup.bash
You can now start ronoco with the command
roslaunch ronoco rolling.launch namespace:=/tb3
In a first terminal connect to the robot via ssh and then run the command roslaunch turtlebot3_ros4pro bringup.launch.
For mapping
Run the command roslaunch turtlebot3_ros4pro slam.launch. RViz will launch and you should see the robot, the LIDAR scans and the map under construction. You can move the robot using the directional arrows of ronoco
In a new terminal run the command roscd turtlebot3_ros4pro/maps/ to go to the folder where the map is saved.
The following command will delete the previous map if there is one, or make a copy if you want to keep it. Run the command roslaunch turtlebot3_ros4pro map_saver.launch which will save the map in the maps folder of the turtlebot3_ros4pro package (maps.yaml and maps.pgm files).
For navigation run the roslaunch command turtlebot3_ros4pro navigation.launch to start location and autonomous navigation. Once rviz is open you can create behaviour trees using ronoco
For example the execution of the tree below
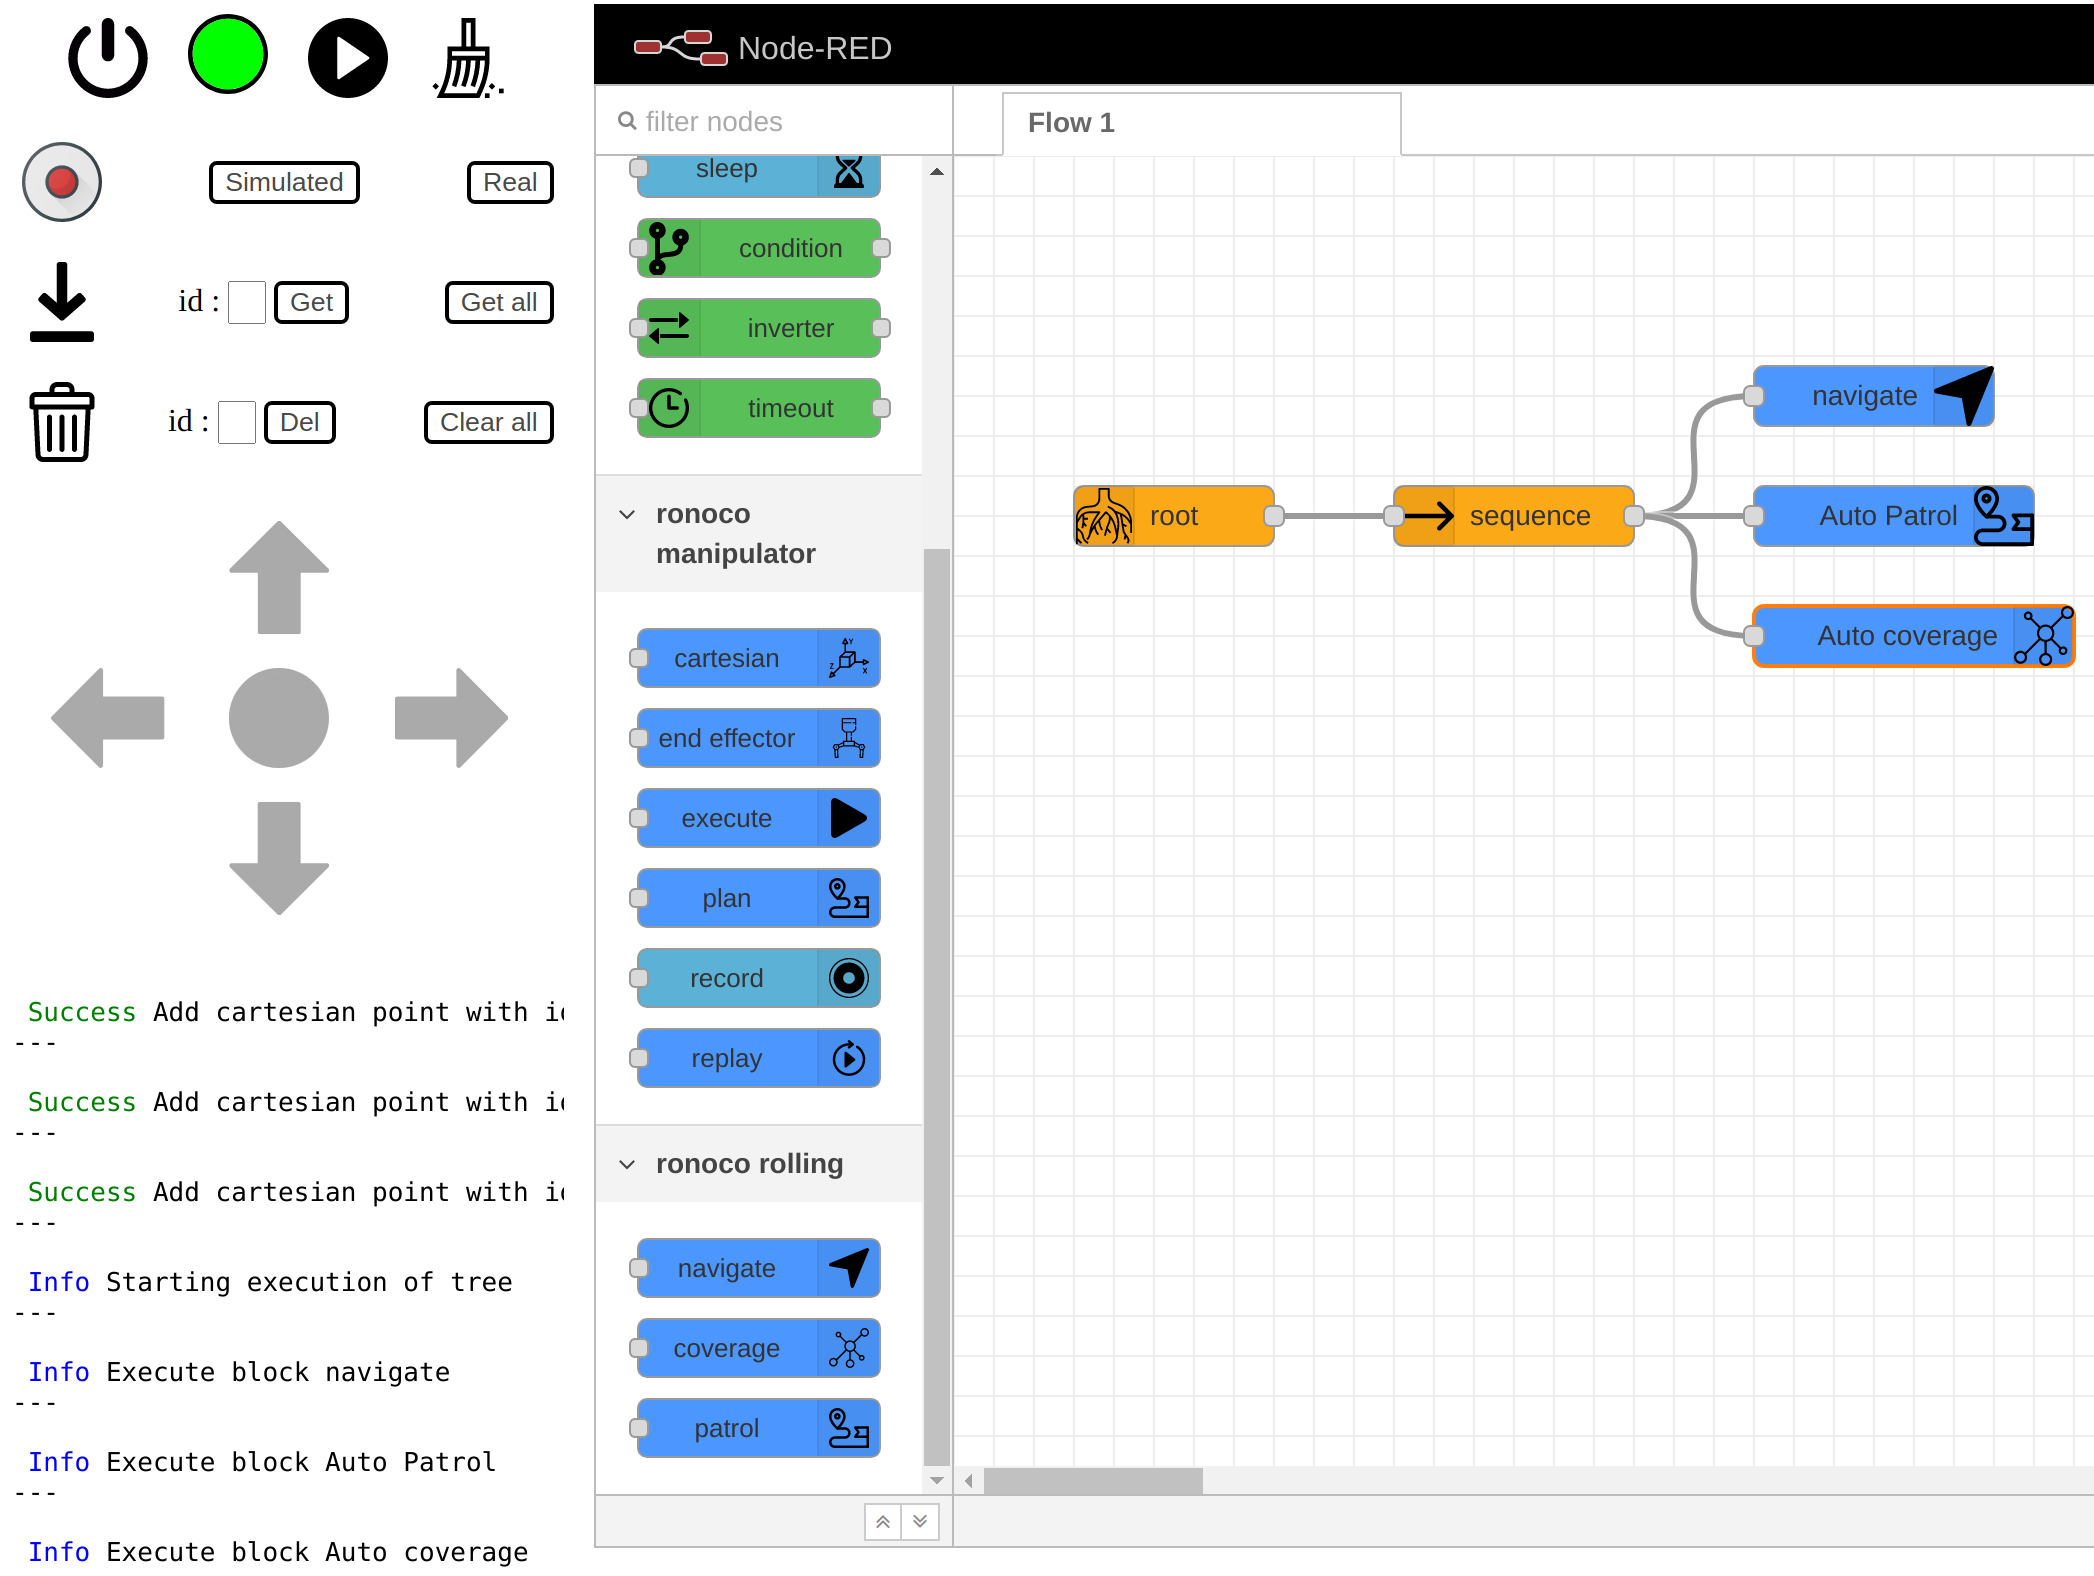
This tree will ask the robot to navigate to point 0, then to patrol between points 0, 1 and 2 and finally to scan the polygon formed by points 0, 1 and 2. Its execution gives the result below.
Developers Guides
Ces guides permettent à un développeur sachant manipuler du HTML / Javascript et python d'améliorer les fonctionnalités de ronoco
Add blocks to node-red
The addition of new blocks in Ronoco is done in two parts : on the one hand the creation of the block in Node-RED allowing to define its colour, its parameters, etc. On the other hand the creation of the block in the vm allowing to define the behaviour of the block during its execution.
Ronoco - Node-RED
Go to the $HOME/catkin_ws/ronoco/ronoco-nodered folder. We will create a simple block which will be part of the common blocks. This block will have a Name (optional) and a number (not optional) as parameters.
First, it will be necessary to create the common/simple.html file as follows:
<script type="text/javascript">
    RED.nodes.registerType('simple', {
        category: 'ronoco/common',
        color: '#59c059',
        defaults: {
            name: {value: ""},
            data: {value: "", required: true}
        },
        credential:{
            name: {},
            mode: {},
            data:{}
        },
        inputs: 1,
        outputs: 1,
        icon: "icons/simple.svg",
        label: function () {
            return this.name || "simple";
        },
    });
</script>

<script type="text/html" data-template-name="simple">
    <div class="form-row">
        <label for="node-input-name"><i class="fa fa-tag"></i> Name</label>
        <input type="text" id="node-input-name" placeholder="Name">
    </div>
    <div class="form-row">
        <label for="node-input-data"><i class="fa fa-tag"></i> Data</label>
        <input type="number" id="node-input-data" placeholder="Data">
    </div>
</script>

<script type="text/html" data-help-name="simple">
    Here we have a simple documentation
</script>
Then you need to create the common/simple.js file as follows
"use strict";

module.exports = function (RED) {
    function Simple(config) {
        RED.nodes.createNode(this, config);
        const node = this;
        node.on('input', function (msg) {
            node.send(msg);
        });
    }

    RED.nodes.registerType("simple", Simple);
}
Finally, you just have to fill in the new block in the package.json of the project
"node-red": {
    "nodes": {
        ...
        "simple": "common/simple.js"
        ...
    }
}
Simply reinstall the palette in Node-RED to see the new block
cd $HOME/.node-red
npm install $HOME/catkin_ws/src/ronoco/ronoco-nodered/
For more information on the construction of the blocks, please refer to the Node-RED documentation
Ronoco - VM
Once the block is defined in Node-RED it is still necessary to give it behaviour in the vm. The definition of behaviour in the VM happens in the $HOME/catkin_ws/src/ronoco/ronoco-vm/ronoco_vm/behaviour folder. First we will define the node behaviour. As Ronoco-vm uses the py_trees library to execute behaviour trees we must respect the interface, refer to the py_trees documentation for more information. Then just create a simple.py file in the behaviour folder.
# !/usr/bin/env python3
# -*- coding: utf-8 -*-

import logger
import py_trees

class Simple(py_trees.behaviour.Behaviour):
    def __init__(self, name, data):
        super(Simple, self).__init__(name)
        self.time = float(data)

    def setup(self, timeout):
        self.logger.debug("  %s [Simple::setup()]" % self.name)
        return True

    def initialise(self):
        self.logger.debug("  %s [Simple::initialise()]" % self.name)

    def update(self):
        self.logger.debug("  %s [Simple::update()]" % self.name)
        # Do something
        return py_trees.Status.SUCCESS #or return py_trees.Status.FAILURE

    def terminate(self, new_status):
        self.logger.debug("  %s [Simple::terminate().terminate()][%s->%s]" % (self.name, self.status, new_status))
⚠ This implementation allows you to define execution blocks. Control blocks and decorators are natively supported by py_trees. To define others, please refer to the py_trees documentation
Once the behaviour of the block is defined it is still necessary to register the block in the vm so that it can be recognised and interpreted. To do this open the behaviour.py file in the behaviour folder. Start by defining the method for building the block. This method must require the parameters name, data, child. The method should return a tuple Boolean, Object, String where Boolean is True if the block is buildable, Object contains the built block if it is buildable and String contains an error message if the object is not buildable. In sum for the simple block we have :
def simple(name, data, child):
    # Set default name if it is empty
    if name is None or name == "":
        name = "Record"
    # If data is None we can't build the bloc
    if data is None:
        return False, None, "No data"
    # Else return a Simple object
    return True, behaviour.simple.Simple(name, data), None
You still need to associate the name of the block with this function. At the end of the behaviour.py file add 'simple':simple to the types dictionary. Since the simple block is an execution block and requires data to function it is necessary to add its name to the leaf and data_node dictionaries.
⚠ In case the new block has multiple parameters it is necessary to signal this to the vm by modifying the multiple_data_nodes(node_json) method of the control.py file in the ronoco_vm folder
Ronoco API Documentation
This section provides a precise description of the different modules that make up ronoco. The first is a summary of the different endpoints of ronoco-vm. The second is the documentation of the ronoco-vm codes. Finally the last one details the behaviour of each block visible in Node-RED
Ronoco-vm API - Summarized documentation
The table below lists all the endpoints of ronoco-vm and their different possible behaviour
| URL | Method | Body | Return Code | Return | Description |
|---|---|---|---|---|---|
| / | GET | 200 | {"Success": "Server is running"} | ||
| /shutdown | GET | Shutdown flask server | |||
| /connect | GET | 200 | {"Success": "Connected with commander " + move_group} | Connexion with commander etablished | |
| /connect | GET | 404 | {"Error": "Can't connect to commander please retry with connect button"} | Connexion with commander not etablished | |
| /free/ | GET | 200 | {'compliant': 'True'} | Robot is compliant | |
| /free/ | GET | 200 | {'compliant': 'False'} | Robot is not compliant | |
| /free/ | POST | {'compliant': 'True'} | 200 | {'compliant': 'True'} | Robot has been set compliant |
| /free/ | POST | {'compliant': 'False'} | 200 | {'compliant': 'False'} | Robot has been set not compliant |
| /free/ | POST | None or incorrect | 400 | Bad Request | |
| /free/ | POST | {'compliant' : 'Bool'} | 404 | Not Found | Robot is not alive |
| /point/add/simulation | POST | {} | 408 | {"Error": "Rviz doesn't send response"} | Rviz is not alive or very slow |
| /point/add/simulation | POST | {} | 200 | {"Success" : "Add cartesian point with id: int"} | A point has been recorded |
| /point/add/actual | POST | {} | 408 | {"Error": "MoveIt doesn't send response"} | MoveIt is not alive or very slow |
| /point/add/actual | POST | {} | 200 | {"Success" : "Add cartesian point with id: int"} | A point has been recorded |
| /point/get | GET | 404 | {"Error": "No point have been recorded"} | ros parameters server (on the name "cartesianPoints") is empty | |
| /point/get | GET | 200 | A json with all cartesian points | ||
| /point/get/id | GET | 404 | {"Error": "No point have been recorded"} | ros parameters server (on the name "cartesianPoints") doesn't contain point with this id | |
| /point/get/id | GET | 200 | A json with one point | ||
| /point/delete | POST | {} | 200 | {"Success": "All points have been deleted"} | All points have been cleared or database was empty |
| /point/delete/id | POST | {} | 404 | {"Error": "No point match with id: int" | ros parameters server (on the name "cartesianPoints") doesn't contain point with this id |
| /point/delete/id | POST | {} | 200 | {"Success": "Point have been deleted"} | Point has been deleted |
| /control/ | POST | an export of nodered tree | 200 | {"Success": "All behavior trees has been executed"} | |
| /control/ | POST | None | 400 | {"Error": "json is empty"} | Can't evaluate an empty file |
| /control/ | POST | an export of nodered tree | 400 | {"Error": "json contains 0 valid roots"} | Json is not empty but doesn't contain root block |
| /control/ | POST | an export of nodered tree | 400 | {"Error": "Tree with root id | Json contains a root block but associate tree is incorrect |
| /control/ | POST | an export of nodered tree | 400 | {"Error": "Block (or child of this block) with id | Json contains tree but one block is incorrect |
| /control/stop | GET | 200 | {"Success": "Behavior tree has been stopped "} | Current behavior tree is stopped | |
| /teleop/force-stop | POST | {} | 200 | "Success" | Robot stop |
| /teleop/forward | POST | {} | 200 | "Success" | Robot go forward |
| /teleop/backward | POST | {} | 200 | "Success" | Robot go backward |
| /teleop/left | POST | {} | 200 | "Success" | Robot go left |
| /teleop/right | POST | {} | 200 | "Success" | Robot go right |
Tests
To launch test you need to launch rolling robot or a manipulator arm with one of these exemple commands :
# for manipulator arm
roslaunch ur3_moveit_config demo.launch config:=true

# for rolling robot
roslaunch turtlebot3_gazebo turtlebot3_house.launch
# in another terminal
roslaunch turtlebot3_navigation turtlebot3_navigation.launch
Then launch ronoco
# for manipulator arm
roslaunch ronoco manipulator.launch commander:=manipulator compliant_mode:=manual

# for rolling robot
roslaunch ronoco rolling.launch mode:=rolling topic_move_base:=/move_base amcl_pose:=/amcl_pose cmd_vel:=/cmd_vel
Finally, launch test
cd $HOME/catkin_ws/src/ronoco/ronoco-vm
python3 tests/launcher.py
Ronoco-vm API - Detailed documentation
Run
Define and setup flask server and rostopic subscriber / publisher for ronoco-vm
Build a Flask instance and configure it
- test_config: path to configuration file (Default : None)
Register blueprint in app.
The class attribute "app" must contain a Flask instance
Uses rospy to subscribe to the different topics needed by the API
Common
Definition of common endpoint
GET Method
ROUTE /
Sends every 5 seconds the server status on the websocket "states" channel.
The server state depends on the operating mode of ronoco.
In manipulator mode the state of ros, MoveIt, rviz and the MoveGroupCommander
In rolling mode, the state of ros, rviz and the various topics necessary for the operation of rolling robots (cmd_vel, move_base, amcl_pose)
Check if you can communicate with MoveIT
- Use rosservice /move_group/get_loggers
- Node: /move_group
- Type: roscpp/GetLoggers
- Args:
Check if you can communicate with moveit
- Use rosservice /move_group/get_loggers
- Node: /move_group
- Type: roscpp/GetLoggers
- Args:
Check if rviz send data on topic /rviz_moveit_motion_planning_display/robot_interaction_interactive_marker_topic /update
Check if commander is initialized
Check if you can communicate with move_base and amcl_pose + Use rosservice /move_base/get_loggers + Node: /move_base + Type: roscpp/GetLoggers + Args:
- Use rosservice /amcl_pose/get_loggers
- Node: /amcl_pose
- Type: roscpp/GetLoggers
- Args:
GET Method
ROUTE /shutdown
Shutdown server with config.socketio.stop() (and shutdown send_states() daemon)
GET Method
ROUTE /connect
Connect to config.move_group with moveit_commander.MoveGroupCommander
Free
Implements free endpoints to set and get the compliance (or 0 gravity robot WIP) of robot
GET/POST Method
ROUTE /free/
POST body { "compliant" : "True"/"False" }
Allows you to get or set robot compliance
- Use rosservice /set_compliant
- Node: /joint_trajectory_action_server
- Type: std_srvs/SetBool
- Args: data
CartesianPoint
Allows adding, get and delete a cartesian point in the ros parameters server from Rviz or compliant mode
This method adds a cartesian point in the ros parameters server (on the name "cartesianPoints"). This method is called when a POST request is made on point/add/simulation or point/add/real
- cartesian_point: a cartesian point eg {"position": {"x": pose.x, "y": pose.y, "z": pose.z}, "orientation": {"x": orientation.x, "y": orientation.y, "z": orientation.z, "w": orientation.w}}
This method deletes a cartesian point in the ros parameters server (on the name "cartesianPoints"). This method is called when a DELETE request is made on point/delete
- identifiant: a number
This method find a cartesian point in the ros parameters server (on the name "cartesianPoints"). This method is called when a GET request is made on point/get/number or point/get
- identifiant: a number
This method deletes all cartesian points in the ros parameters server (on the name "cartesianPoints"). This method is called when a POST request is made on point/delete
POST Method
ROUTE /point/add/actual
POST body { }
Manipulator only
Allows you to add a Cartesian point corresponding to the current position of the robot.
The id of the position is automatically given
POST Method
ROUTE /point/add/actual
POST body { }
Rolling only
Allows you to add a Cartesian point corresponding to the current position of the robot.
The id of the position is automatically given
POST Method
ROUTE /point/add/simulation
POST body { }
Allows you to add a Cartesian point corresponding to the current position of the robot in Rviz.
The id of the position is automatically given
GET Method
ROUTE /point/get
Allows you to get all Cartesian points in the ros parameters server (on the name "cartesianPoints")
GET Method
ROUTE /point/get/
Allows you to get one Cartesian point in the ros parameters server (on the name "cartesianPoints")
- identifiant: a number
POST Method
ROUTE /point/delete/
POST body { }
Allows you to delete one Cartesian point in the ros parameters server (on the name "cartesianPoints")
- identifiant: a number
POST Method
ROUTE /point/delete
POST body { }
Allows you to delete all Cartesian points in the ros parameters server (on the name "cartesianPoints")
Add marker in rviz
- point: localization of marker
Add marker in rviz
- id: id of marker
Clear all markers in rviz
Control
Definition of the endpoint control to analyse and execute behaviour trees
POST Method
ROUTE /compute/
POST body : an export of nodered tree
This method is the main method of the endpoint to transform the json from nodered (or any other tool respecting the json syntax) into a behaviour tree with the py_tree package. Once built, the method call play then executes the different trees.
Every behaviour tree starts with a root block, blocks that are not connected (directly or indirectly) to a root are ignored.
Each root must be connected to strictly one block to be interpreted.
To be interpreted a flow must contain at least one behaviour tree
- {"Success" : "All behavior trees has been executed", 200} if the tree is built and executed correctly.
- {"Error": "Block (or child of this block) with id
is incorrect", 400} if it is not
Browse the list of previously constructed trees and execute them using the tick_tock method
Search in BT-json blocks with type 'root'
- bt: a json representing a behaviour tree (export of nodered)
Search in the json passed in parameter for a block with the string id passed in parameter
- identifiant: the id of the block searched for
- bt: a json representing a behaviour tree (export of nodered)
Builds the behaviour tree as a py_tree object from its root using a bfs algorithm
- json_node: a node of a tree in json format
- bt: a json representing a behaviour tree (export of nodered)
Transforms a decorator from a json to a py_tree object. In order to build the decorators it is necessary that the other blocks are already built
- node: the decorator in json format
- bt: a json representing a behaviour tree (export of nodered)
Analyses the data of a node and according to its type correctly formats the data dictionary.
Normally this function only returns the data field of the node but some special nodes escape this rule.
- node_json: the node to evaluate
Transforms all the nodes of the tree from json form to py_tree form. This function does not handle decorator blocks that need special treatment concerning their children
- bt: a json representing a behaviour tree (export of nodered)
Stop execute of current behavior tree
Recorder
Recorder class copy from Poppy project
Start the recording of a trajectory
Stop recording then save it as a json file
- trajectory_name: record's name
Find in the trajectory directory json file with a specific name the convert it in a RobotTrajectory
- trajectory_name: name of a previously recorded path
Logger
Definition of a logger for the websocket to be displayed in ronoco-ui
Send a message to the /control_log namespace via socketio's emit method The message must be a dictionary with at least one key/value
Some particular keys will be interpreted and reformatted by ronoco-ui (Debug, Success, Error, Warning, Info)
The other keys will be displayed rawly way
- msg: the message to send
Sends a message with the debug key if the verbosity level is greater than or equal to 4
- msg: a string message
Sends a message with the info key if the verbosity level is greater than or equal to 3
- msg: a string message
Sends a message with the warn key if the verbosity level is greater than or equal to 2
- msg: a string message
Sends a message with the error key if the verbosity level is greater than or equal to 1
- msg: a string message
Teleoperation
Definition of endpoint teleoperation allowing to manually move rolling robot
POST Method
POST Body {}
ROUTE /teleop/direction
Where direction is :
- force-stop
- forward
- backward
- left
- right
Set a twist vector with desired velocity then launch thread to execute it
- direction: desired direction in force-stop, forward, backward, left, right
Target of thread which continuously publish actualised twist message on topic cmd_vel
Add 0.01 to twist linear x (forward)
Remove 0.01 to twist linear x (backward)
Add 0.1 to twist angular z (left)
Remove 0.1 to twist angular z (right)
Set to 0.0 twist linear x and twist angular z (stop)
Ronoco-VM API - Behaviour documentation
The Behaviour module is the implementation in Ronoco-vm of the different blocks accessible from Node-RED. Indeed, each block on Node-RED (plan, execute, cartesian etc) is associated with a treatment in Ronoco-vm. The beahviour module is the heart of this processing and allows to identify the existing blocks and to associate functions to them.
Behaviour
List the existing blocks and their type (control node, execution nodes etc).
Defines the functions allowing to instantiate the different blocks while checking the content of the parameters.
The interface implemented forces all these functions to have name, data and child parameters.
- name: The name of the block (optional)
- data: The data used to build the block (optional for some blocks, mandatory for others)
- child: the child of the block to instantiate in the behaviour tree (mandatory for decorators)
Common
 selector
Instantiates a selector node
A selector executes each of its child behaviours in turn until one of them succeeds (at which point it itself returns RUNNING or SUCCESS, or it runs out of children at which point it itself returns FAILURE. We usually refer to selecting children as a means of choosing between priorities. Each child and its subtree represent a decreasingly lower priority path.
![]() sequence
sequence
Instantiates a sequence node
A sequence will progressively tick over each of its children so long as each child returns SUCCESS. If any child returns FAILURE or RUNNING the sequence will halt and the parent will adopt the result of this child. If it reaches the last child, it returns with that result regardless.
The sequence halts once it sees a child is RUNNING and then returns the result. It does not get stuck in the running behaviour.
 parallel
Instantiates a parallel node
Ticks every child every time the parallel is run (a poor man’s form of paralellism).
- Parallels will return FAILURE if any child returns FAILURE
- Parallels with policy SUCCESS_ON_ONE return SUCCESS if at least one child returns SUCCESS and others are RUNNING.
- Parallels with policy SUCCESS_ON_ALL only returns SUCCESS if all children return SUCCESS
 condition
Instantiates a condition node
Encapsulates a behaviour and wait for its status to flip to the desired state. This behaviour will tick with RUNNING while waiting and SUCCESS when the flip occurs.
- data: SUCCESS, FAILURE or RUNNING
- child: must be provided
 inverter
Instantiates a inverter node
A decorator that inverts the result of a class’s update function.
- child: must be provided
 timeout
Instantiates a timeout node
A decorator that applies a timeout pattern to an existing behaviour. If the timeout is reached, the encapsulated behaviour’s stop() method is called with status FAILURE otherwise it will simply directly tick and return with the same status as that of it’s encapsulated behaviour.
- data: time in seconds as an integer
- child: must be provided
 service
Allows you to call a service offered by the robot. Perform rosservice list to get the list of available services
- name: String - name of current block
- name of service: String - The name of the service to be called. The name must not be preceded by a /.
- Parameters of service: Array - The parameters to be provided to the service. The parameters must be enclosed in brackets and separated by commas.
 sleep
sleep
Blocks allowing to wait during n secondes
- name: String - name of current block
- duration of sleep: Integer - Duration of sleep in seconds
Manipulator
 execute
Execute the movement between the current position and a position given in the constructor parameter.
Use MoveGroupCommander.set_pose_target() and MoveGroupCommander.go()
- data: identifier of a point as an integer
 plan
plan
Planning movement between the current position and a position given in the constructor parameter.
Use MoveGroupCommander.set_pose_target() and MoveGroupCommander.plan()
- data: identifier of a point as an integer
 cartesian
Cartesian movement between the current position and a position given in the constructor parameter
Use geometry_msgs.msg.PoseStamped(), MoveGroupCommander.compute_cartesian_path() and MoveGroupCommander.execute()
- data: a dictionary like {'point_id' : integer, 'reliability': integer (0-100), 'eef' : float}
 record
Record all trajectories during a time specified by a parameter in constructor
- data: a dictionary like {'identifiant' : string, 'time': integer}
 replay
Replays a previously recorded path
- data: name of a recorded trajectory as a string
 end_effector
Allows control of the robot end effector via an associated service passed as a parameter to ronoco.launch (the robot end effector controller must be started independently).
This block returns SUCCESS if it has succeeded in completing the action and FAILURE if it has caught something in its path. Otherwise, the combination of "end_effector" and an "inverter" will return SUCCESS if the robot has caught something.
- name: String - name of current block
- data: Array - The parameters to be provided to the service. The parameters must be enclosed in brackets and separated by commas.
Rolling
 navigate
Allows you to navigate to a point on a map while avoiding map obstacles.
- name: String - Name of current block
- data: Integer - The identifier of the point in the ros parameter server (on the name "cartesianPoints"). Use Ronoco-ui to find out which points are registered.
 coverage
Block allowing to carry out a navigation with coverage, i.e. a movement covering as much surface as possible between n points
This procedure only needs to be done the first time rviz is started. Once you have done it, you do not need to do it again each time
To view the area to be scanned in rviz it is necessary to add a marker: click on "add" at the bottom left of the screen. A menu opens. Click on "Marker". Then in the menu on the left of your screen (Displays) find "Marker". Scroll down the menu and set the "Marker topic" field to "path_coverage_marker".

You can save this configuration of rviz so that you do not need to repeat this procedure in the future.
To use the block, you can do so in two ways:
either you have filled in the "Points making up the polygon" field of a point array. At this point the block will automatically scan the polygon closed by this point list.
or you have left it empty. When the system executes the block, it will give you back your hand to request the area to be scanned. To do this, go into rviz, using the "publish point" tool click on a point on the map. Repeat the operation until you draw a polygon on the map. Once the polygon is closed (i.e. the last point placed corresponds to the first point placed) ronoco will take over and scan the area.
- name: String - Name of current block
- robot width: Float - width of the robot in meter
patrol
Block allowing to carry out a patrol, i.e. navigation on the edges of a user-defined polygon
This procedure only needs to be done the first time rviz is started. Once you have done it, you do not need to do it again each time To view the area to be scanned in rviz it is necessary to add a marker: click on "add" at the bottom left of the screen. A menu opens. Click on "Marker". Then in the menu on the left of your screen (Displays) find "Marker". Scroll down the menu and set the "Marker topic" field to "path_coverage_marker".
You can save this configuration of rviz so that you do not need to repeat this procedure in the future.
To use the block, you can do so in two ways:
either you have filled in the "Points making up the way" field of a point array. At this point the block will automatically navigate on this way.
or you have left it empty. When the system executes the block, it will give you back your hand to request the area to be patrolled. To do this, go into rviz, using the "publish point" tool click on a point on the map. Repeat the operation until you draw a way on the map. Once the way is closed (i.e. the last point placed corresponds to the first point placed) ronoco will take over and scan the area.
- name: String - Name of current block
- robot width: Float - width of the robot in meter
- Points making up the way (optional): An array of identifiers (in brackets separated by commas) defining the way. The way is closed automatically.
Users guides
These guides are intended for users who want to install and use ronoco. The guides are illustrated with examples of how ronoco is used on different robots.
Installation
The installation is divide into two parts. First it is necessary to install ROS Noetic and then to install the different modules of ronoco. An installation guide for ROS noetic for Ubuntu is provided below. Refer to the official page for more details
Ubuntu install of ROS Noetic
Configure your Ubuntu to allow "restricted", "universe" and "multiverse". You can follow the Ubuntu guide for instructions on doing this.
Set up your computer to accept software from packages.ros.org
sudo sh -c 'echo "deb http://packages.ros.org/ros/ubuntu $(lsb_release -sc) main" \
> /etc/apt/sources.list.d/ros-latest.list'
Set up your keys
sudo apt install curl # if you haven't already installed curl
curl -s https://raw.githubusercontent.com/ros/rosdistro/master/ros.asc | \
sudo apt-key add -
First, make sur your Debian package index is up-to-date then install ROS
sudo apt update
sudo apt install ros-noetic-desktop-full
You must source this script in every bash terminal you use ROS in
source /opt/ros/noetic/setup.bash
It can be convenient to automatically source this script every time a new shell is launched. These commands will do that for you
echo "source /opt/ros/noetic/setup.bash" >> ~/.bashrc
source $HOME/.bashrc

#or if you use zsh
echo "source /opt/ros/noetic/setup.zsh" >> ~/.zshrc
source $HOME/.zshrc
Ronoco
To install ronoco you need the following packages:
- npm
- python3
- ROS noetic (also works on ROS melodic)
To start it is necessary to clone the project in the catkin workspace
#if you haven't got a catkin_ws
mkdir -p $HOME/catkin_ws/src
cd $HOME/catkin_ws/
catkin_make

cd $HOME/catkin_ws/src/
git clone https://github.com/Sdelpeuch/ronoco.git
Then you have to install the three modules that constitute ronoco. Firstly ronoco-nodered allowing the user to define the behaviour trees of the robot (see How to use it and How to create a behaviour tree). This module depends on Node-RED, so it is necessary to install the framework and then the blocks specific to ronoco.
sudo npm install -g --unsafe-perm node-red
mkdir $HOME/.node-red/
cd $HOME/.node-red/
npm install $HOME/catkin_ws/src/ronoco/ronoco-nodered/
Once ronoco-nodered is installed it is necessary to install the web client inside ronoco-ui
cd $HOME/catkin_ws/src/ronoco/ronoco-ui/
npm install
Finally, all that remains is to install the application engine found in ronoco-vm.
cd $HOME/catkin_ws/src/ronoco/ronoco-vm/
pip3 install -r requirements.txt
Before using ronoco it is necessary to compile the ROS workspace
cd $HOME/catkin_ws/
catkin_make
source devel/setup.bash

#or if you use zsh
source devel/setup.zsh
To start ronoco refer to the Getting Started page
Getting started
Quick-start : roslaunch
To launch the project, simply run the following command:
roslaunch ronoco ronoco.launch commander:=string compliant_mode:=string end_effector:=string
With as argument :
- commander: the name of the move_group in MoveIt
- compliant_mode: manual if the robot can go into compliant mode manually, None if the robot cannot go into compliant mode, or the name of the service to put it in and out of compliant mode.
- end_effector: the name of the service to manipulate the effector, e.g. "wsg_50_driver/move". It is not necessary to fill in this field
Manual start
To use ronoco it is necessary to launch the ROS modules corresponding to your robot and then the different modules of ronoco.
Regarding the launching of ROS modules the procedure is different for each robot, to make ronoco work it is necessary to have a roscore and Moveit running. See the different examples on Poppy Ergo Jr or Universal Robots 3 for more details.
First set parameters in rosparam
rosparam set commander string
rosparam set compliant_mode string
rosparam set end_effector string
It is then necessary to launch the three modules.
# Launching of nodered in a terminal
node-red
# Launching of ronoco-vm in another terminal
cd $HOME/catkin_ws/src/ronoco/ronoco-vm/
python3 ronoco_vm/run.py
# Launching of ronoco-ui in another terminal
cd $HOME/catkin_ws/src/ronoco/ronoco-ui/
npm start
Once all the modules are running go to your localhost:8080 and you will arrive at the ronoco page:

How to use it
This page explains how to use the application to control a robot. It is divided in 3 parts, the first one explains how to use the different buttons of the control interface. The second part explains how to create behaviour trees and the specificities of the different blocks.
Control Interface
Control Interface
 Allows to stop the server (WIP: allows to start and stop the whole application)
 Represents the status of the server, when it is empty it means that the client has not yet received any information from the server. It is probably still loading.
 When it is black (here white) it means that at least one request to the server has not been answered and therefore the server is not running or is in error
 When it is red, it means that it is not possible to reach the commander. Check that MoveIt is running and that the order passed as a parameter is the right one, then click on the connect button
 When it is orange it means that ROS is not working as expected. The source of the problem is either the absence of roscore (the rosout/get_loggers service is not available) or the absence of moveit (the move_group/get_loggers service is not available). In this state ronoco is not usable
 When it is yellow it means that Rviz is not communicating the position of the interactive marker. If rviz seems to be working correctly on your machine, simply move the interactive marker to fix the problem. In this state ronoco is usable but the "simulated" button will produce an error
 When it is green it means that ronoco is fully usable
 This button asks the server to execute the last behaviour tree deployed from Node-RED
 Enables the robot to be set to compliant mode. This button can only be used for a robot that has a service to set it to compliant mode
 Allows to connect to the commander passed in parameter when the status of ronoco is red
![]() Clear logs in ronoco-ui
Clear logs in ronoco-ui
 This group of buttons allows you to record points in the environment. There are two recording modes either via the simulated button which records the position of the interactive marker. Or via the real button which records the actual position of the robot.
 This group of buttons allows you to view the different registered positions. It is possible to consult a specific position by filling in the id field and then pressing get or to consult all the registered positions by using the get all button.
 This group of buttons allows you to delete the different registered positions. It is possible to delete a specific position by filling in the id field and then pressing delete or delete all registered positions by using the clear all button
Area for creating behaviour trees

Area for creating behaviour trees
The behaviour tree creation area is an instance of Node-RED it is necessary to have the Ronoco specific Node-RED palette installed to use the application. Refer to the installation page
⚠️ Ronoco is not compatible with the native Node-RED blocks, only the blocks of the ronoco-nodered palette are usable. You can make the native blocks disappear by clicking on the three horizontal bars at the top right, then Manage Palette and finally click on disable all for the node-red palette.
This section explains how to create a tree interpretable by ronoco-vm and run it. To learn how to create behaviour trees, refer to the associated page. For the documentation of each block, you can access it directly from ronoco or from the behaviours documentation.
Access to block documentation from Ronoco
 To create Ronoco interpretable trees any tree must start with a root block and must contain at least one leaf (blue coloured blocks), a tree not starting with a root block will simply be ignored.
The root and decorators blocks (green blocks) must be followed by a single child.
The sequence, selector and parallel blocks accept multiple children.
All blocks (except the root block) can be the child of multiple blocks.
The behaviour trees are read from left to right and from top to bottom. If two child blocks of the same block are placed at the same height, an error will be raised.
A worksheet can contain multiple trees identified by their root block. If this is the case, the trees will be executed according to the height of their root block on the sheet (from top to bottom)
To execute a behaviour tree with ronoco it is necessary to click on the deploy button at the top right of the window and then on the play button of the control interface.
How to create a behaviour tree
This page is an introduction to the behaviour trees used in Ronoco to define programs. It is inspired by Robotic Sea Bass - Introduction to Behavior Trees, and the documentation of py_trees
What is a Behaviour Tree ?
There are several abstractions to help design complex behaviors for an autonomous agent. Generally, these consist of a finite set of entities that map to particular behaviors or operating modes within our system, e.g., “move forward”, “close gripper”, “blink the warning lights”, “go to the charging station”. Each model class has some set of rules that describe when an agent should execute each of these behaviors, and more importantly how the agent should switch between them.
Behavior trees (BTs) are one such abstraction, which I will define by the following characteristics:
- Behavior Trees and trees : They start at a root node and are designed to be traversed in a specific order until a terminal state is reached
- Leaf nodes are executable behaviours : Each leaf will do something, whether it's a simple check or a complex action, and will output a status (success, failure or running). In other words, leaf nodes are where you connect a BT to the lower-level code for your specific application.
- Internal nodes control tree traversal: The internal nodes of the tree will accept the resulting status of their children and apply their own rules to dictate which node should be expanded next.
Behaviour Tree Terminology
Let's dig into the terminology in behaviour trees.
At a glance, these are the types of nodes that make up behaviour trees and how they are represented graphically

Behaviour trees execute in discrete update steps known as ticks. When a BT is ticked, usually at some specified rate, its child nodes recursively tick based on how the tree is constructed. After a node ticks, it returns a status to its parent, which can be Sucess, Failure, or Running.
Execution nodes, which are leaves of the BT, can either be Action or Condition nodes. The only diffrence is that nodes can only return Success or Failure within a single tick, whereas action nodes can span multiple ticks and can return Running until they reach a terminal state. Generally, condition nodes represent simple checks (e.g., "is the gripper open ?") while action nodes represent complex actions (e.g. "open the door").
Control nodes are internal nodes and define how to traverse the BT given the status of their children. Importantly children of control nodes can be execution nodes or control nodes themselves. Sequence, Selector and Parallel nodes can have any number of children, but differ in how they process said children. Decorator nodes necessarily have one child, and modify its behavior with some custom defined policy.
- Sequence nodes execute children in order until one child returns Failure or all children returns Success
- Selector nodes execute children in order until one of them returns Success or all children return Failure.
- Parallel nodes will execute all their children in "parallel". This is in quotes because it's not true parallelism, at each tick, each node will individually tick in order. Parallel nodes return Success when at least one child nodes have succeeded, and Failure when all child nodes have failed.
- Decorator nodes modify a single child node with a custom policy. For example "inverter" decorator will change Success to Failure and vice-versa. To see all available decorators refer to the Ronoco Node-RED documentation.
Examples
In Node-RED the behaviour trees are read from left to right and from top to bottom. In the first example, the "root" node is read first, then "sequence", then "plan" and finally "execute".
Let's start with a simple example, a sequence to plan a path to a point and then execute it. If the planning to the point succeeds then the execution will be done. However, if the planning fails, the sequence will be interrupted and the execution will not take place.

In this more complete example we will want to go to the original position and then perform a Cartesian move to position 1 in less than 10 seconds otherwise go to position 2.
To do this we start with a sequence of two children. The first one asks to move to the home position, then if the execution is successful we introduce a two-child selector. The first one asks to perform a Cartesian move to position 1, it is accompanied by a timeout decorator set to 10 seconds. If the timeout is exceeded or the move is not feasible then this first child returns a failure. At this point the selector will execute its second child consisting of moving to position 2. If the first child returns a success the selector does not need to execute its second child and the execution of this tree ends.

Example on Poppy Ergo Jr
This page presents a complete use of ronoco on a poppy ergo jr it uses the resources of learn.e.ros4.pro concerning the Poppy Ergo Jr.
It is necessary to have a ROS installation, a ROS workspace and ronoco to follow this page. Refer to the installation guide if necessary.
Prepare Poppy Ergo Jr
Start by assembling your robot, following the steps for ROS if applicable, then configure your motors
Download the ROS image to flash an SD card. To flash the image to an SD card: + Extract the compressed .zip or .7z file to a folder on the computer + Use the software etcher (or equivalent) + In Etcher, "Flash from file", select the image file and the destination (the SD card) and validate
To connect the robot in Wifi : + Insert the SD card of the robot in question in your workstation and open the partition named boot + Download the file wpa_supplicant.conf in boot and modify it to fill in the right wifi password inside. + Download the file wpa_supplicant.conf in boot and modify it to fill in the right wifi password inside + Create an empty file named .ssh in the same place in the boot. + Type the command sync and cleanly assign the SD card
These 2 files wpa_supplicant.conf and .ssh will be deleted the next time the robot is started, indicating that the Wifi connection request has been accepted. It is therefore normal that you will not find them when you look at the boot content again after the first start of the robot.
In case of problems, it is possible to connect an HDMI display to the Raspberry Pi, the network manager is on the top right.
The Wi-Fi connection also works with Android and iOS mobile access points.
Make sure that the ROS_MASTER_URI on your workstation and on your poppy point to the same address. If not, modify and source your .bashrc.
The controller is already on the robot. You can connect directly to the robot and start it. If you have chosen to point the ROS_MASTER_URI at your workstation, do not forget to run a roscore before
ssh pi@poppy.local
roslaunch poppy_controllers control.launch
Start MoveIt with a real robot
Install MoveIt then clone the ROS package Poppy Ergo Jr MoveIt Configuration, it contains the code needed to make this robot work with MoveIt :
sudo apt install ros-noetic-moveit
cd $HOME/catkin_ws/src
git clone https://github.com/poppy-project/poppy_ergo_jr_moveit_config.git
cd $HOME/catkin_ws/
catkin_make
source $HOME/.bashrc
Start MoveIt with roslaunch with the fake_execution parameter set to false to connect to the real robot:
roslaunch poppy_ergo_jr_moveit_config demo.launch fake_execution:=false gripper:=true
Rviz should start with a Poppy Ergo Jr in view corresponding to the state of your robot in real time.
⚠️ At this stage, make sure that the posture of your robot in RViz corresponds to the current posture of the real robot: the angles of the motors and the location of the rivets must correspond in every way to your real robot. It is frequent that robots are incorrectly assembled, in this case close MoveIt and go back to the assembly guide step by step to correct before continuing.
Start Ronoco
To launch the project, simply run the following command:
roslaunch ronoco ronoco.launch commander:=arm_and_finger compliant_mode:=/set_compliant
Once all the modules are running go to your localhost:8080 and you will arrive at the ronoco page:
Use Ronoco
For a full understanding of this part it is preferable to have followed the tutorials How to use it and How to create a behaviour tree
The gif below shows a use of Ronoco
Universal robot 3
Configuring ROS with universal robots
This driver requires a system setup with ROS. It is recommended to use Ubuntu 18.04 with ROS melodic however using Ubuntu 20.04 with ROS noectic work also. To install ROS noetic on Ubuntu 20.04 see the relative page
First it is necessary to download and install Universal Robots ROS Driver by performing the commands below
# source global ros
source /opt/ros/<ros_distro>/setup.<bash/zsh>

# create a catkin workspace if necessary
mkdir -p catkin_ws/src && cd catkin_ws

# clone the driver
git clone https://github.com/UniversalRobots/Universal_Robots_ROS_Driver.git src/Universal_Robots_ROS_Driver

# clone fork of the description. This is currently necessary, until the changes are merged upstream.
git clone -b calibration_devel https://github.com/fmauch/universal_robot.git src/fmauch_universal_robot

# install dependencies
sudo apt update -qq
rosdep update
rosdep install --from-paths src --ignore-src -y

# build the workspace
catkin_make

# activate the workspace (ie: source it)
source devel/setup.<bash/zsh>
Prepare the robot
For using the ur_robot_driver with a real robot you need to install the externalcontrol-1.0.4.urcap see
Installing
a URCap on a CB3 robot
or
Installing a URCap on a e-Serries robot.
Prepare the ROS PC
Though this step is not necessary to control the robot using this driver, it is highly recommended to do so, as otherwise endeffector positions might be off in the magnitude of centimeters.
For this, there exists a helper script :
roslaunch ur_calibration calibration_correction.launch robot_ip:=<robot_ip> \
target_filename:="${HOME}/calibration.yaml"
For the parameter robot_ip insert the IP address on which the ROS pc can reach the robot.
Quick Start
Once the driver is built and the externalcontrol URCap is installed on the robot, you are good to go ahead starting the driver. To actually start the robot driver use one of the existing launch files
roslaunch ur_robot_driver <robot_type>_bringup.launch robot_ip:=192.168.56.101 \
kinematics_config:="${HOME}/calibration.yaml"
Where <robot_type> is one of ur3, ur5, ur10, ur3e, ur5e, ur10e, ur16e.
If everything went well you can run rosrun rqt_joint_trajectory_controller rqt_joint_trajectory_controller to check that the communication between the PC and the robot is effective.
Once this is done you can start MoveIt, to do this run the command roslaunch ur3_moveit_config ur3_moveit_planning_execution.launch. Once MoveIt is running it is possible to start rviz via the command roslaunch ur3_moveit_config moveit_rviz.launch config:=true.
There have been problems with controllers running the path from rviz, for more information see the logs
Using ronoco with a universal robot
Once the installation procedure of ROS on a universal robots model is completed, you just have to start ronoco by following the Quick Start with the followings arguments :
- commander: manpiulator
- compliant_mode: manual
Once started you can use ronoco in the usual way.
Limitations
Universal robots do not support the use of "free mode" at the same time as the execution of a program, i.e. when executing the ExternalControl block it is not possible to use the "free mode" function. Thus the record and replay blocks cannot be used on a universal robot.
WIP : create record & replay in rviz
Kuka KR6

Ronoco API Documentation
This section provides a precise description of the different modules that make up ronoco. The first is a summary of the different endpoints of ronoco-vm. The second is the documentation of the ronoco-vm codes. Finally the last one details the behaviour of each block visible in Node-RED
Ronoco-vm API - Summarized documentation
The table below lists all the endpoints of ronoco-vm and their different possible behaviour
| URL | Method | Body | Return Code | Return | Description |
|---|---|---|---|---|---|
| / | GET | 200 | {"Success": "Server is running"} | ||
| /shutdown | GET | Shutdown flask server | |||
| /free/ | GET | 200 | {'compliant': 'True'} | Robot is compliant | |
| /free/ | GET | 200 | {'compliant': 'False'} | Robot is not compliant | |
| /free/ | POST | {'compliant': 'True'} | 200 | {'compliant': 'True'} | Robot has been set compliant |
| /free/ | POST | {'compliant': 'False'} | 200 | {'compliant': 'False'} | Robot has been set not compliant |
| /free/ | POST | None or incorrect | 400 | Bad Request | |
| /free/ | POST | {'compliant' : 'Bool'} | 404 | Not Found | Robot is not alive |
| /point/add/simulation | POST | {} | 408 | {"Error": "Rviz doesn't send response"} | Rviz is not alive or very slow |
| /point/add/simulation | POST | {} | 200 | {"Success" : "Add cartesian point with id: int"} | A point has been recorded |
| /point/add/actual | POST | {} | 408 | {"Error": "MoveIt doesn't send response"} | MoveIt is not alive or very slow |
| /point/add/actual | POST | {} | 200 | {"Success" : "Add cartesian point with id: int"} | A point has been recorded |
| /point/get | GET | 404 | {"Error": "No point have been recorded"} | ros parameters server (on the name "cartesianPoints") is empty | |
| /point/get | GET | 200 | A json with all cartesian points | ||
| /point/get/id | GET | 404 | {"Error": "No point have been recorded"} | ros parameters server (on the name "cartesianPoints") doesn't contain point with this id | |
| /point/get/id | GET | 200 | A json with one point | ||
| /point/delete | POST | {} | 200 | {"Success": "All points have been deleted"} | All points have been cleared or database was empty |
| /point/delete/id | POST | {} | 404 | {"Error": "No point match with id: int" | ros parameters server (on the name "cartesianPoints") doesn't contain point with this id |
| /point/delete/id | POST | {} | 200 | {"Success": "Point have been deleted"} | Point has been deleted |
| /control/ | POST | an export of nodered tree | 200 | {"Success": "All behavior trees has been executed"} | |
| /control/ | POST | None | 400 | {"Error": "json is empty"} | Can't evaluate an empty file |
| /control/ | POST | an export of nodered tree | 400 | {"Error": "json contains 0 valid roots"} | Json is not empty but doesn't contain root block |
| /control/ | POST | an export of nodered tree | 400 | {"Error": "Tree with root id | Json contains a root block but associate tree is incorrect |
| /control/ | POST | an export of nodered tree | 400 | {"Error": "Block (or child of this block) with id | Json contains tree but one block is incorrect |
| /control/stop | GET | 200 | {"Success": "Behavior tree has been stopped "} | Current behavior tree is stopped |
Ronoco-vm API - Detailed documentation
Run
Define and setup flask server and rostopic subscriber / publisher for ronoco-vm
Build a Flask instance and configure it
- test_config: path to configuration file (Default : None)
Register blueprint in app.
The class attribute "app" must contain a Flask instance
Uses rospy to subscribe to the different topics needed by the API
Common
Definition of common endpoint
GET Method
ROUTE /
This function check if the state of the robot or rviz has changed. If so, it sends a message to the websockets states channel
Check if you can communicate with MoveIT
- Use rosservice /move_group/get_loggers
- Node: /move_group
- Type: roscpp/GetLoggers
- Args:
Check if you can communicate with moveit
- Use rosservice /move_group/get_loggers
- Node: /move_group
- Type: roscpp/GetLoggers
- Args:
Check if rviz send data on topic /rviz_moveit_motion_planning_display/robot_interaction_interactive_marker_topic /update
GET Method
ROUTE /shutdown
Shutdown server with config.socketio.stop() (and shutdown send_states() daemon)
Free
Implements free endpoints to set and get the compliance (or 0 gravity robot WIP) of robot
GET/POST Method
ROUTE /free/
POST body { "compliant" : "True"/"False" }
Allows you to get or set robot compliance
- Use rosservice /set_compliant
- Node: /joint_trajectory_action_server
- Type: std_srvs/SetBool
- Args: data
CartesianPoint
Allows adding, get and delete a cartesian point in the ros parameters server from Rviz or compliant mode
This method adds a cartesian point in the ros parameters server (on the name "cartesianPoints"). This method is called when a POST request is made on point/add/simulation or point/add/real
- cartesian_point: a cartesian point eg {"position": {"x": pose.x, "y": pose.y, "z": pose.z}, "orientation": {"x": orientation.x, "y": orientation.y, "z": orientation.z, "w": orientation.w}}
This method deletes a cartesian point in the ros parameters server (on the name "cartesianPoints"). This method is called when a DELETE request is made on point/delete
- identifiant: a number
This method find a cartesian point in the ros parameters server (on the name "cartesianPoints"). This method is called when a GET request is made on point/get/number or point/get
- identifiant: a number
This method deletes all cartesian points in the ros parameters server (on the name "cartesianPoints"). This method is called when a POST request is made on point/delete
POST Method
ROUTE /point/add/actual
POST body { }
Allows you to add a Cartesian point corresponding to the current position of the robot.
The id of the position is automatically given
POST Method
ROUTE /point/add/simulation
POST body { }
Allows you to add a Cartesian point corresponding to the current position of the robot in Rviz.
The id of the position is automatically given
GET Method
ROUTE /point/get
Allows you to get all Cartesian points in the ros parameters server (on the name "cartesianPoints")
GET Method
ROUTE /point/get/
Allows you to get one Cartesian point in the ros parameters server (on the name "cartesianPoints")
- identifiant: a number
POST Method
ROUTE /point/delete/
POST body { }
Allows you to delete one Cartesian point in the ros parameters server (on the name "cartesianPoints")
- identifiant: a number
POST Method
ROUTE /point/delete
POST body { }
Allows you to delete all Cartesian points in the ros parameters server (on the name "cartesianPoints")
Control
Definition of the endpoint control to analyse and execute behaviour trees
POST Method
ROUTE /compute/
POST body : an export of nodered tree
This method is the main method of the endpoint to transform the json from nodered (or any other tool respecting the json syntax) into a behaviour tree with the py_tree package. Once built, the method call play then executes the different trees.
Every behaviour tree starts with a root block, blocks that are not connected (directly or indirectly) to a root are ignored.
Each root must be connected to strictly one block to be interpreted.
To be interpreted a flow must contain at least one behaviour tree
- {"Success" : "All behavior trees has been executed", 200} if the tree is built and executed correctly.
- {"Error": "Block (or child of this block) with id
is incorrect", 400} if it is not
Browse the list of previously constructed trees and execute them using the tick_tock method
Search in BT-json blocks with type 'root'
- bt: a json representing a behaviour tree (export of nodered)
Search in the json passed in parameter for a block with the string id passed in parameter
- identifiant: the id of the block searched for
- bt: a json representing a behaviour tree (export of nodered)
Builds the behaviour tree as a py_tree object from its root using a bfs algorithm
- json_node: a node of a tree in json format
- bt: a json representing a behaviour tree (export of nodered)
Transforms a decorator from a json to a py_tree object. In order to build the decorators it is necessary that the other blocks are already built
- node: the decorator in json format
- bt: a json representing a behaviour tree (export of nodered)
Analyses the data of a node and according to its type correctly formats the data dictionary.
Normally this function only returns the data field of the node but some special nodes escape this rule.
- node_json: the node to evaluate
Transforms all the nodes of the tree from json form to py_tree form. This function does not handle decorator blocks that need special treatment concerning their children
- bt: a json representing a behaviour tree (export of nodered)
Stop execute of current behavior tree
Recorder
Recorder class copy from Poppy project
Start the recording of a trajectory
Stop recording then save it as a json file
- trajectory_name: record's name
Find in the trajectory directory json file with a specific name the convert it in a RobotTrajectory
- trajectory_name: name of a previously recorded path
Logger
Definition of a logger for the websocket to be displayed in ronoco-ui
Send a message to the /control_log namespace via socketio's emit method The message must be a dictionary with at least one key/value
Some particular keys will be interpreted and reformatted by ronoco-ui (Debug, Success, Error, Warning, Info)
The other keys will be displayed rawly way
- msg: the message to send
Sends a message with the debug key if the verbosity level is greater than or equal to 4
- msg: a string message
Sends a message with the info key if the verbosity level is greater than or equal to 3
- msg: a string message
Sends a message with the warn key if the verbosity level is greater than or equal to 2
- msg: a string message
Sends a message with the error key if the verbosity level is greater than or equal to 1
- msg: a string message
Ronoco-VM API - Behaviour documentation
The Behaviour module is the implementation in Ronoco-vm of the different blocks accessible from Node-RED. Indeed, each block on Node-RED (plan, execute, cartesian etc) is associated with a treatment in Ronoco-vm. The beahviour module is the heart of this processing and allows to identify the existing blocks and to associate functions to them.
Behaviour
List the existing blocks and their type (control node, execution nodes etc).
Defines the functions allowing to instantiate the different blocks while checking the content of the parameters.
The interface implemented forces all these functions to have name, data and child parameters.
- name: The name of the block (optional)
- data: The data used to build the block (optional for some blocks, mandatory for others)
- child: the child of the block to instantiate in the behaviour tree (mandatory for decorators)
 selector
Instantiates a selector node
A selector executes each of its child behaviours in turn until one of them succeeds (at which point it itself returns RUNNING or SUCCESS, or it runs out of children at which point it itself returns FAILURE. We usually refer to selecting children as a means of choosing between priorities. Each child and its subtree represent a decreasingly lower priority path.
![]() sequence
sequence
Instantiates a sequence node
A sequence will progressively tick over each of its children so long as each child returns SUCCESS. If any child returns FAILURE or RUNNING the sequence will halt and the parent will adopt the result of this child. If it reaches the last child, it returns with that result regardless.
The sequence halts once it sees a child is RUNNING and then returns the result. It does not get stuck in the running behaviour.
 parallel
Instantiates a parallel node
Ticks every child every time the parallel is run (a poor man’s form of paralellism).
- Parallels will return FAILURE if any child returns FAILURE
- Parallels with policy SUCCESS_ON_ONE return SUCCESS if at least one child returns SUCCESS and others are RUNNING.
- Parallels with policy SUCCESS_ON_ALL only returns SUCCESS if all children return SUCCESS
 condition
Instantiates a condition node
Encapsulates a behaviour and wait for its status to flip to the desired state. This behaviour will tick with RUNNING while waiting and SUCCESS when the flip occurs.
- data: SUCCESS, FAILURE or RUNNING
- child: must be provided
 inverter
Instantiates a inverter node
A decorator that inverts the result of a class’s update function.
- child: must be provided
 timeout
Instantiates a timeout node
A decorator that applies a timeout pattern to an existing behaviour. If the timeout is reached, the encapsulated behaviour’s stop() method is called with status FAILURE otherwise it will simply directly tick and return with the same status as that of it’s encapsulated behaviour.
- data: time in seconds as an integer
- child: must be provided
 execute
Execute the movement between the current position and a position given in the constructor parameter.
Use MoveGroupCommander.set_pose_target() and MoveGroupCommander.go()
- data: identifier of a point as an integer
 plan
plan
Planning movement between the current position and a position given in the constructor parameter.
Use MoveGroupCommander.set_pose_target() and MoveGroupCommander.plan()
- data: identifier of a point as an integer
 cartesian
Cartesian movement between the current position and a position given in the constructor parameter
Use geometry_msgs.msg.PoseStamped(), MoveGroupCommander.compute_cartesian_path() and MoveGroupCommander.execute()
- data: a dictionary like {'point_id' : integer, 'reliability': integer (0-100), 'eef' : float}
 record
Record all trajectories during a time specified by a parameter in constructor
- data: a dictionary like {'identifiant' : string, 'time': integer}
 replay
Replays a previously recorded path
- data: name of a recorded trajectory as a string
 service
Allows you to call a service offered by the robot. Perform rosservice list to get the list of available services
- name: String - name of current block
- name of service: String - The name of the service to be called. The name must not be preceded by a /.
- Parameters of service: Array - The parameters to be provided to the service. The parameters must be enclosed in brackets and separated by commas.
 end_effector
Allows control of the robot end effector via an associated service passed as a parameter to ronoco.launch (the robot end effector controller must be started independently).
This block returns SUCCESS if it has succeeded in completing the action and FAILURE if it has caught something in its path. Otherwise, the combination of "end_effector" and an "inverter" will return SUCCESS if the robot has caught something.
- name: String - name of current block
- Data: Array - The parameters to be provided to the service. The parameters must be enclosed in brackets and separated by commas.